
How to Remove Background in Photoshop: 4 Methods + AI
The Pen Tool exists. The Magic Wand exists. Select Subject exists. So why does removing a background in Photoshop still feel like a coin flip? Because each tool was built for a different kind of photo — and picking the wrong one is what costs you 30 minutes of cleanup.
This guide walks through the four most reliable ways to remove the background in Photoshop in 2026 — Quick Selection, Magic Wand, Pen Tool, and Select Subject + Select and Mask — with the exact menu paths, the settings that matter, and the kind of image each one actually works on. At the end, we run the same photo through Photoshop and through a one-prompt AI background remover so you can decide which workflow fits the job.
Last updated: May 2026
)
Table of contents
- Why Photoshop background removal is harder than it looks
- Method 1 — Quick Selection Tool
- Method 2 — Magic Wand Tool
- Method 3 — Pen Tool
- Method 4 — Select Subject Photoshop + Select and Mask
- Photoshop vs AI background remover
- Imgezy: a 3-step AI alternative
- Which method should you use?
- FAQ
Why Photoshop background removal is harder than it looks
Photoshop background removal is rarely about one tool — it's about matching the tool to the photo. Quick Selection works on clean edges, Magic Wand works on flat colors, Pen Tool wins on hard product shots, and Select Subject is built for hair and fur. Pick the wrong one and you'll spend the next hour fighting the brush.
Three things make Photoshop background removal slower than people expect:
- Hair, fur, and translucency still trip up edge detection. Even the AI-powered Select Subject has to be cleaned up in the Refine Hair tab.
- Color contamination — fringe pixels keep the original background's color and bleed into the new composition.
- Reflections and shadows are technically part of the subject, but most "remove background" workflows accidentally cut them off, which kills realism.
Adobe's 2025 Creative Trends report found that "background removal" was the second-most-searched Photoshop tutorial topic globally, just behind "how to use layers." The demand is huge — but so is the learning curve. The four methods below cover roughly 95% of real-world Photoshop background removal cases.
)
Method 1 — Quick Selection Tool
The Quick Selection Tool is Photoshop's brush-based selection. Paint over the subject and Photoshop expands the selection to similar pixels, edge by edge. It's the fastest way to remove the background in Photoshop when your subject has clear, high-contrast edges — think a person against a plain wall or a product on seamless backdrop.
Where to find it: Toolbar → Quick Selection Tool (keyboard W). If you see Magic Wand instead, long-press the icon and switch to Quick Selection.
How to use Quick Selection step by step
- Open your photo and duplicate the layer (
Cmd/Ctrl + J). Always work on a copy. - Pick a brush size — start around 30–50 px. Use
[and]to size up or down. A brush slightly smaller than the smallest detail you want to capture works best. - Click "Add to selection" in the top toolbar (the brush with a small
+icon). Drag across the subject in short strokes — the selection expands automatically. - Hold
Alt(Win) /Option(Mac) to switch to "Subtract from selection." Use this to peel back areas where the selection bled into the background. - Click
Select and Mask…in the top toolbar. Inside, set Smooth to 2, Contrast to 10–20, and Shift Edge to about -20% to pull the edge inward and avoid background fringe. - Output to Layer Mask so the original pixels stay editable.
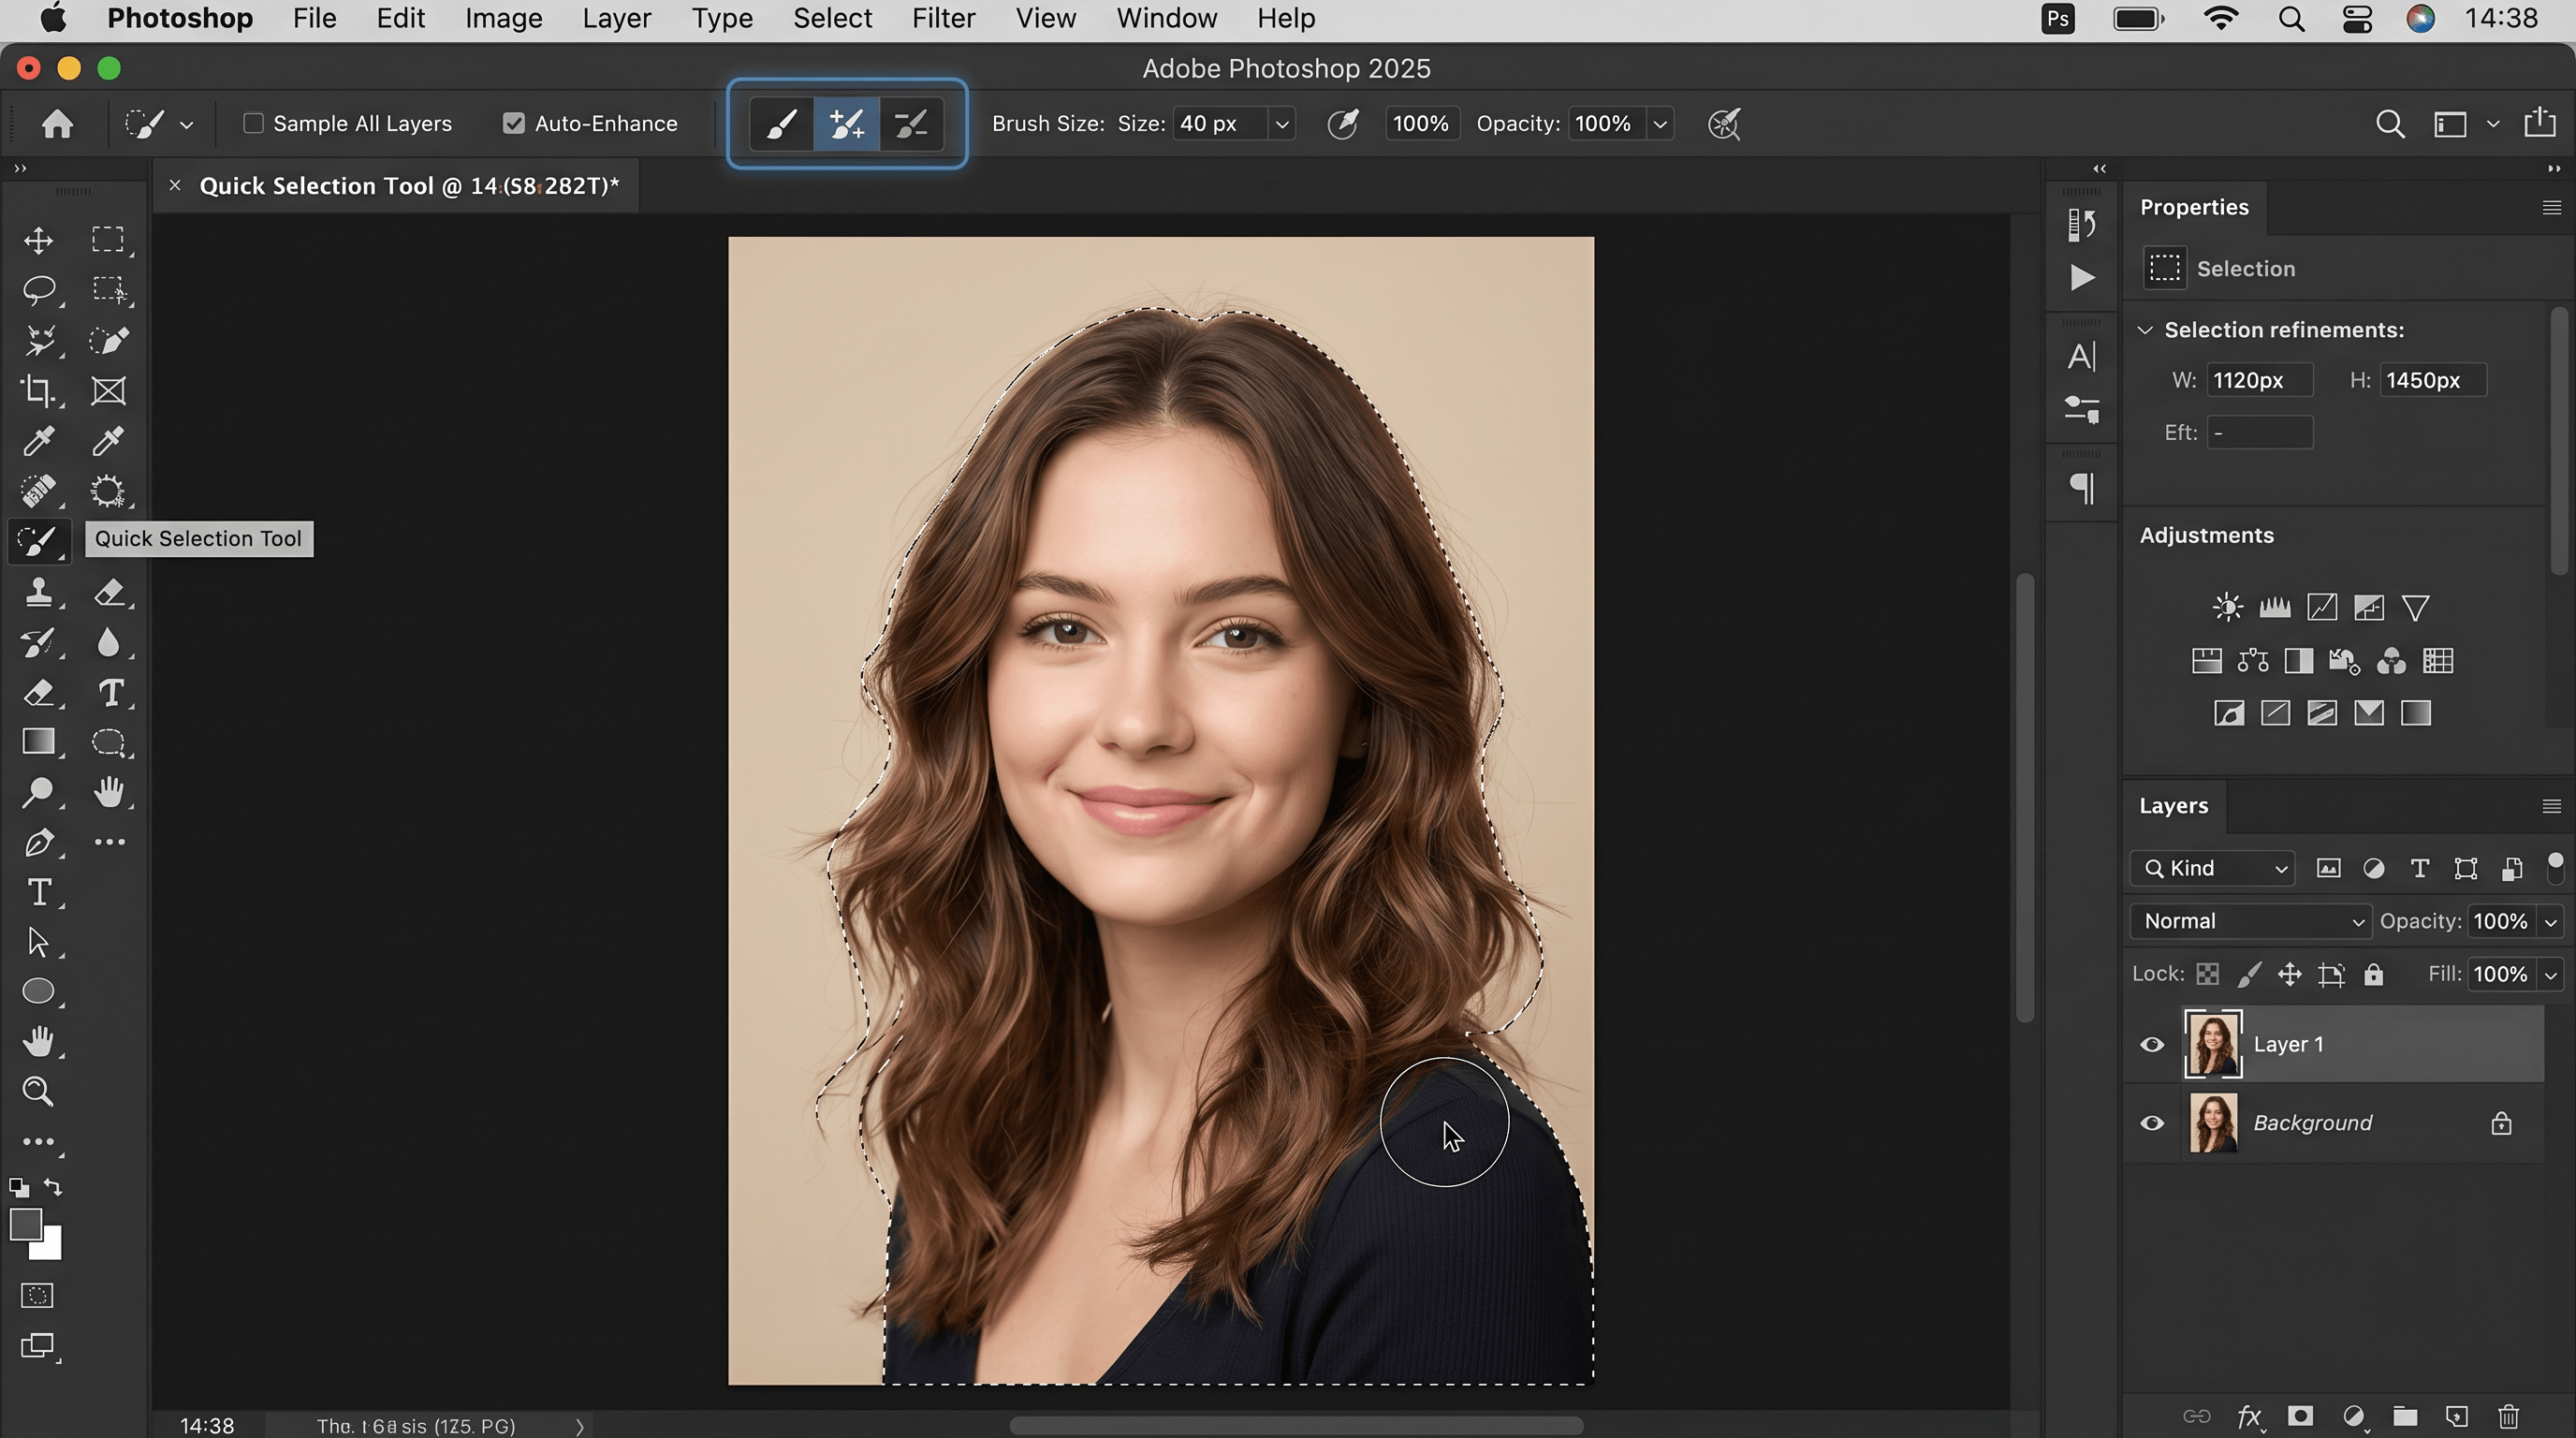
Best for: Headshots on solid backgrounds, packshots, e-commerce product photos with sharp outlines.
Where it fails: Frizzy hair, transparent objects (glass, water), busy backgrounds with similar tones to the subject. Plan on 5–15 minutes per image, longer if you're doing edge cleanup by hand.
Method 2 — Magic Wand Tool
The Magic Wand selects pixels by color similarity. Click anywhere on the background and Photoshop highlights every pixel within a tolerance range. It's the fastest Photoshop background remover for one specific case: flat, single-color backgrounds.
Where to find it: Same toolbar group as Quick Selection — long-press to switch (keyboard W, then Shift + W to cycle).
How to use Magic Wand step by step
- Duplicate your layer (
Cmd/Ctrl + J). - Set Tolerance in the top bar. Default is 32. Drop to 10–20 for clean studio backgrounds; raise to 40–60 if the background has subtle gradients (like a softbox shoot).
- Check "Anti-alias" — leave it on. This softens the edge by 1 px so the cutout doesn't look pixelated.
- Toggle "Contiguous" based on your photo. ON: only selects connected pixels. OFF: selects every pixel of that color in the entire image (useful for backgrounds that wrap around the subject).
- Click on the background once. The marching ants will appear.
- Add to selection with Shift-click on areas the wand missed (between fingers, under arms, holes in the subject).
- Invert the selection with
Cmd/Ctrl + Shift + Ito switch from background to subject. - Add a layer mask (the rectangle-with-circle icon at the bottom of the Layers panel). Done.
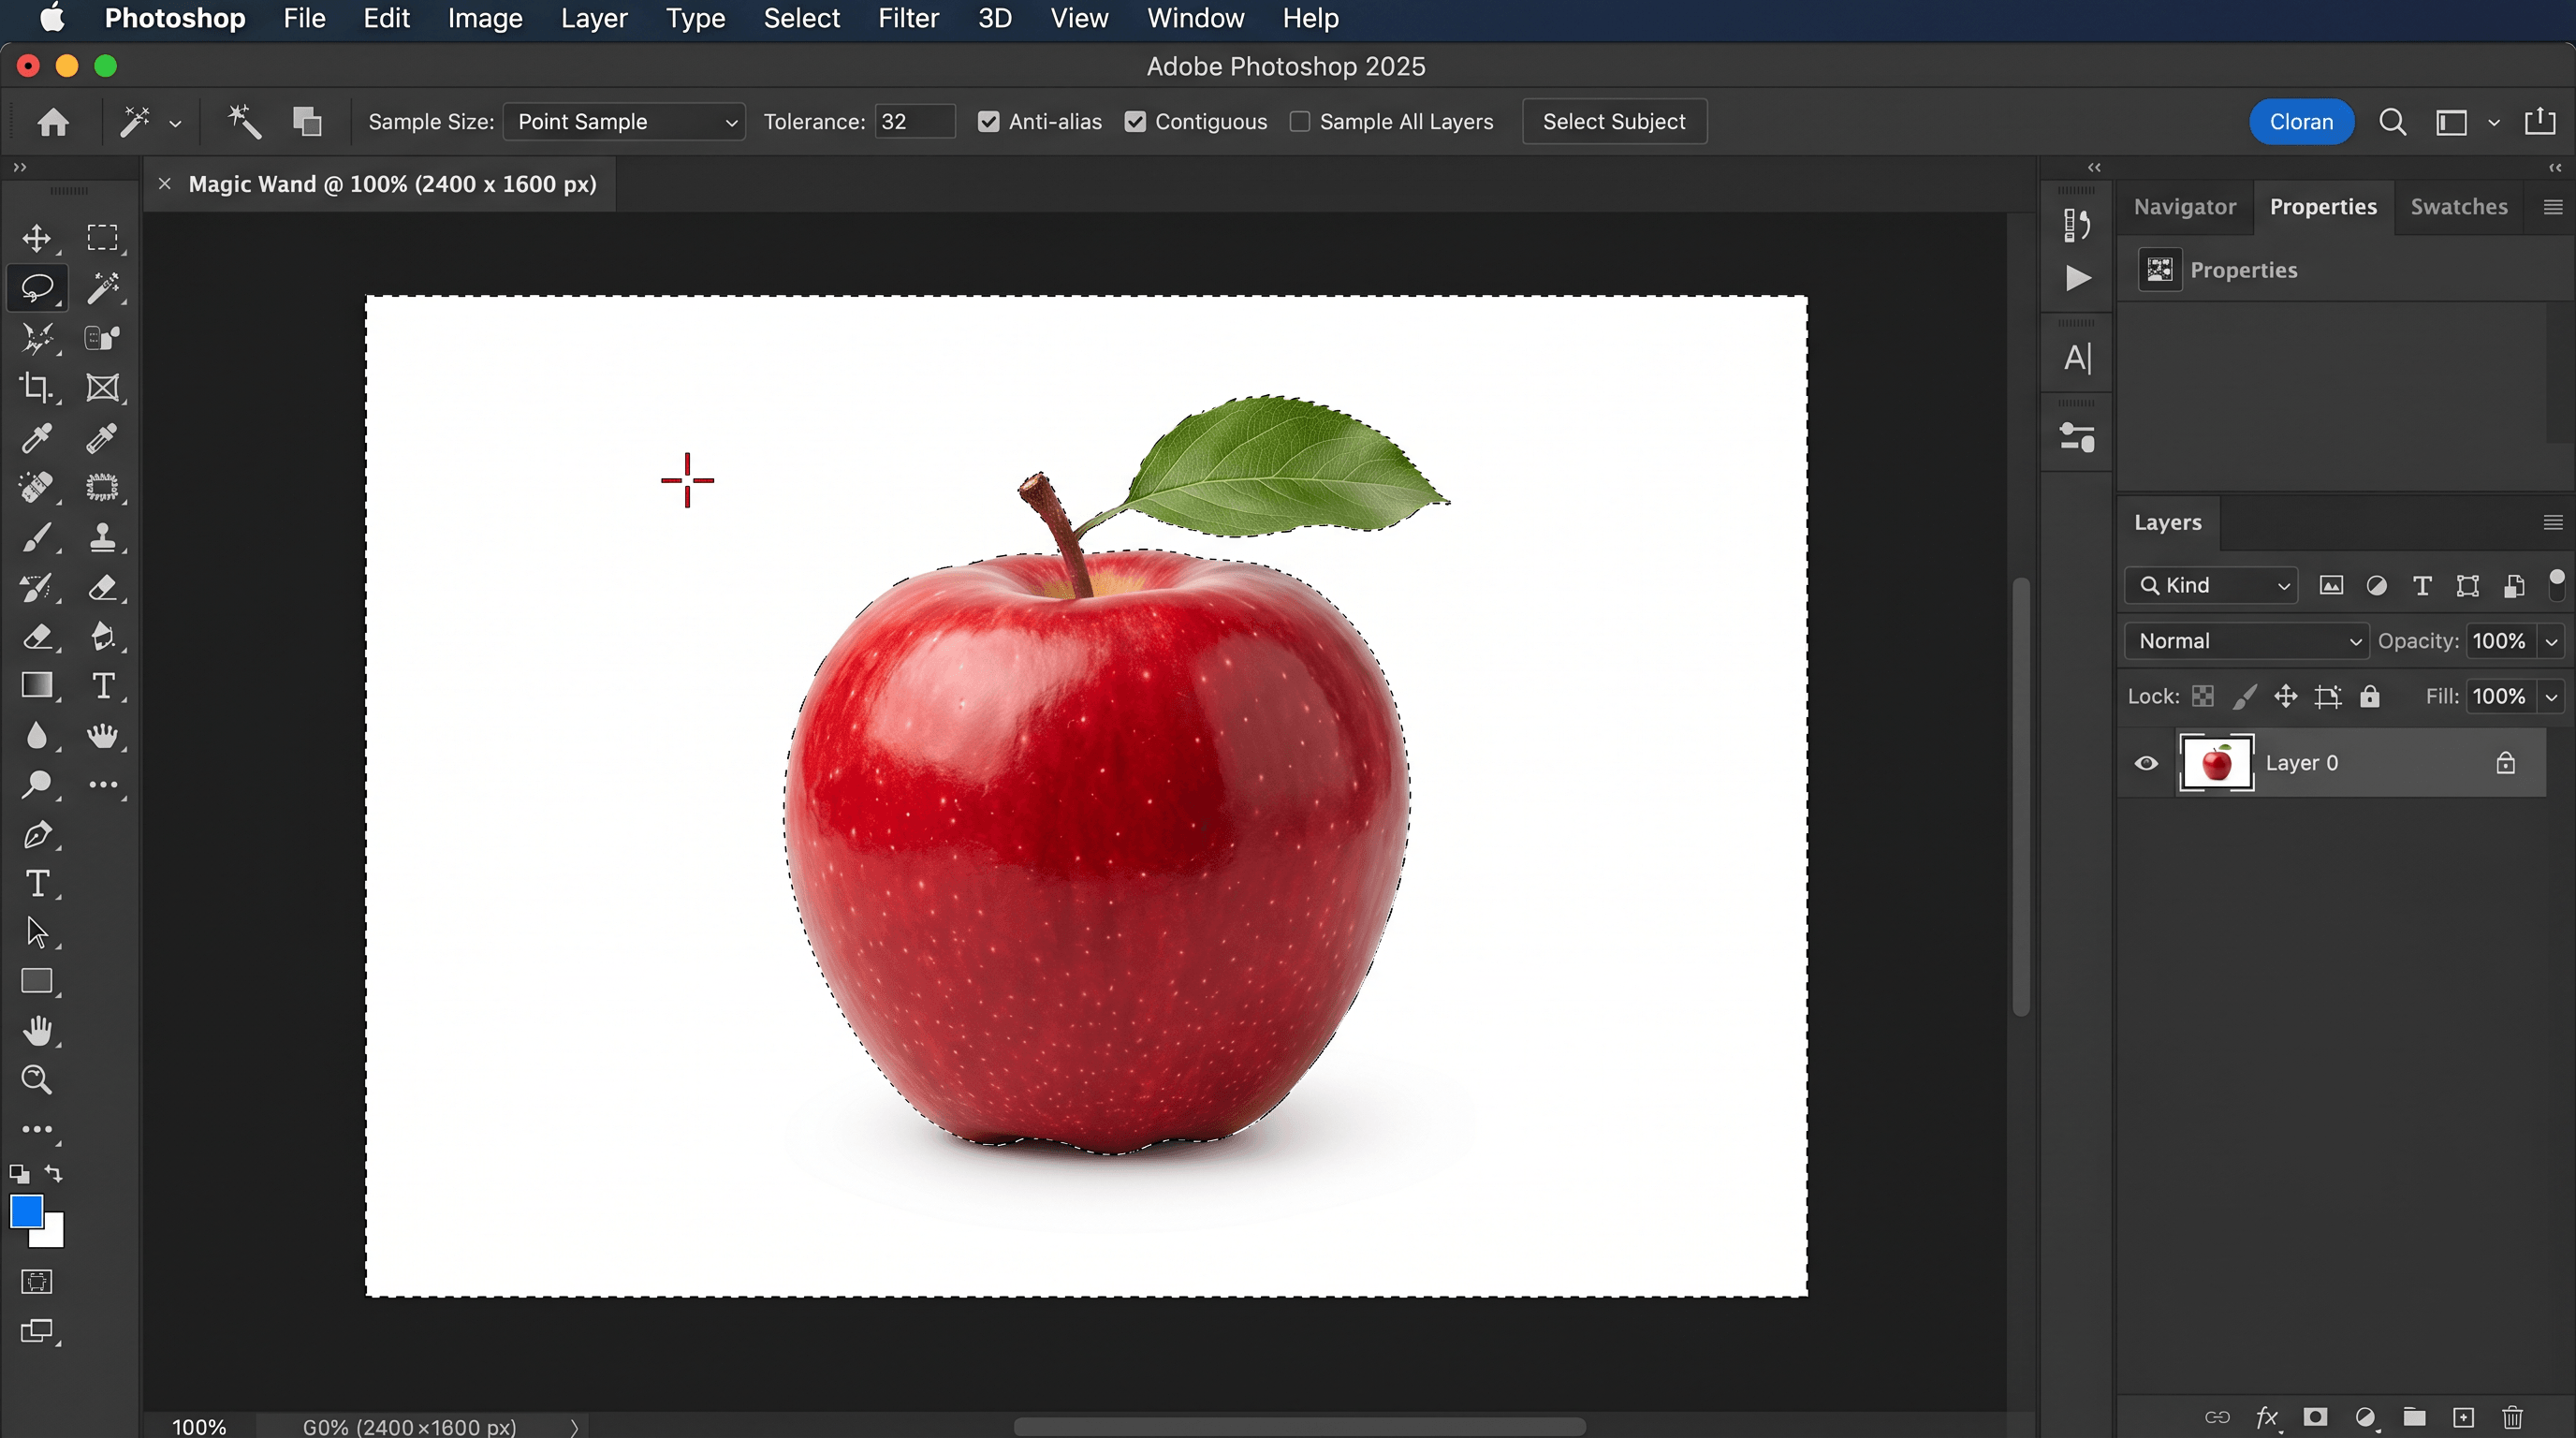
Best for: Studio shots on white/grey/green seamless paper, scanned logos, illustrations.
Where it fails: Gradient backgrounds, photos shot in natural light (sky behind a person), JPEGs with compression artifacts that confuse Tolerance. Note: the Magic Wand is different from the Photoshop Background Eraser, which is a brush built for harder cases — but the Background Eraser is destructive and requires manual hair-by-hair cleanup most users don't have time for.
Method 3 — Pen Tool
The Pen Tool draws a vector path around the subject one anchor point at a time. It's the slowest method on this list, but it produces the cleanest cutout you'll ever get out of Photoshop. Every product photographer who needs perfect hard edges still relies on it.
Where to find it: Toolbar → Pen Tool (keyboard P). Make sure the dropdown at the top is set to "Path," not "Shape."
How to use the Pen Tool step by step
- Zoom in to 200–300%. You can't trace what you can't see.
- Click once on a clean edge of the subject to drop the first anchor point.
- Click and drag on the next point — the click sets the anchor, the drag bends the path. Each curve is shaped by the direction handles.
- Hold
Alt/Optionwhen clicking on an anchor to break the next handle, useful for sharp corners (e.g. the edge of a perfume bottle). - Continue around the subject, dropping points roughly every 30–50 px along curves. Aim for the fewest points that still describe the shape.
- Close the path by clicking the first anchor again — the cursor shows a small
oicon. - Right-click → Make Selection. Set Feather Radius to 0.5 px (any more and you lose edge crispness).
- Add a layer mask to keep the photo non-destructive.
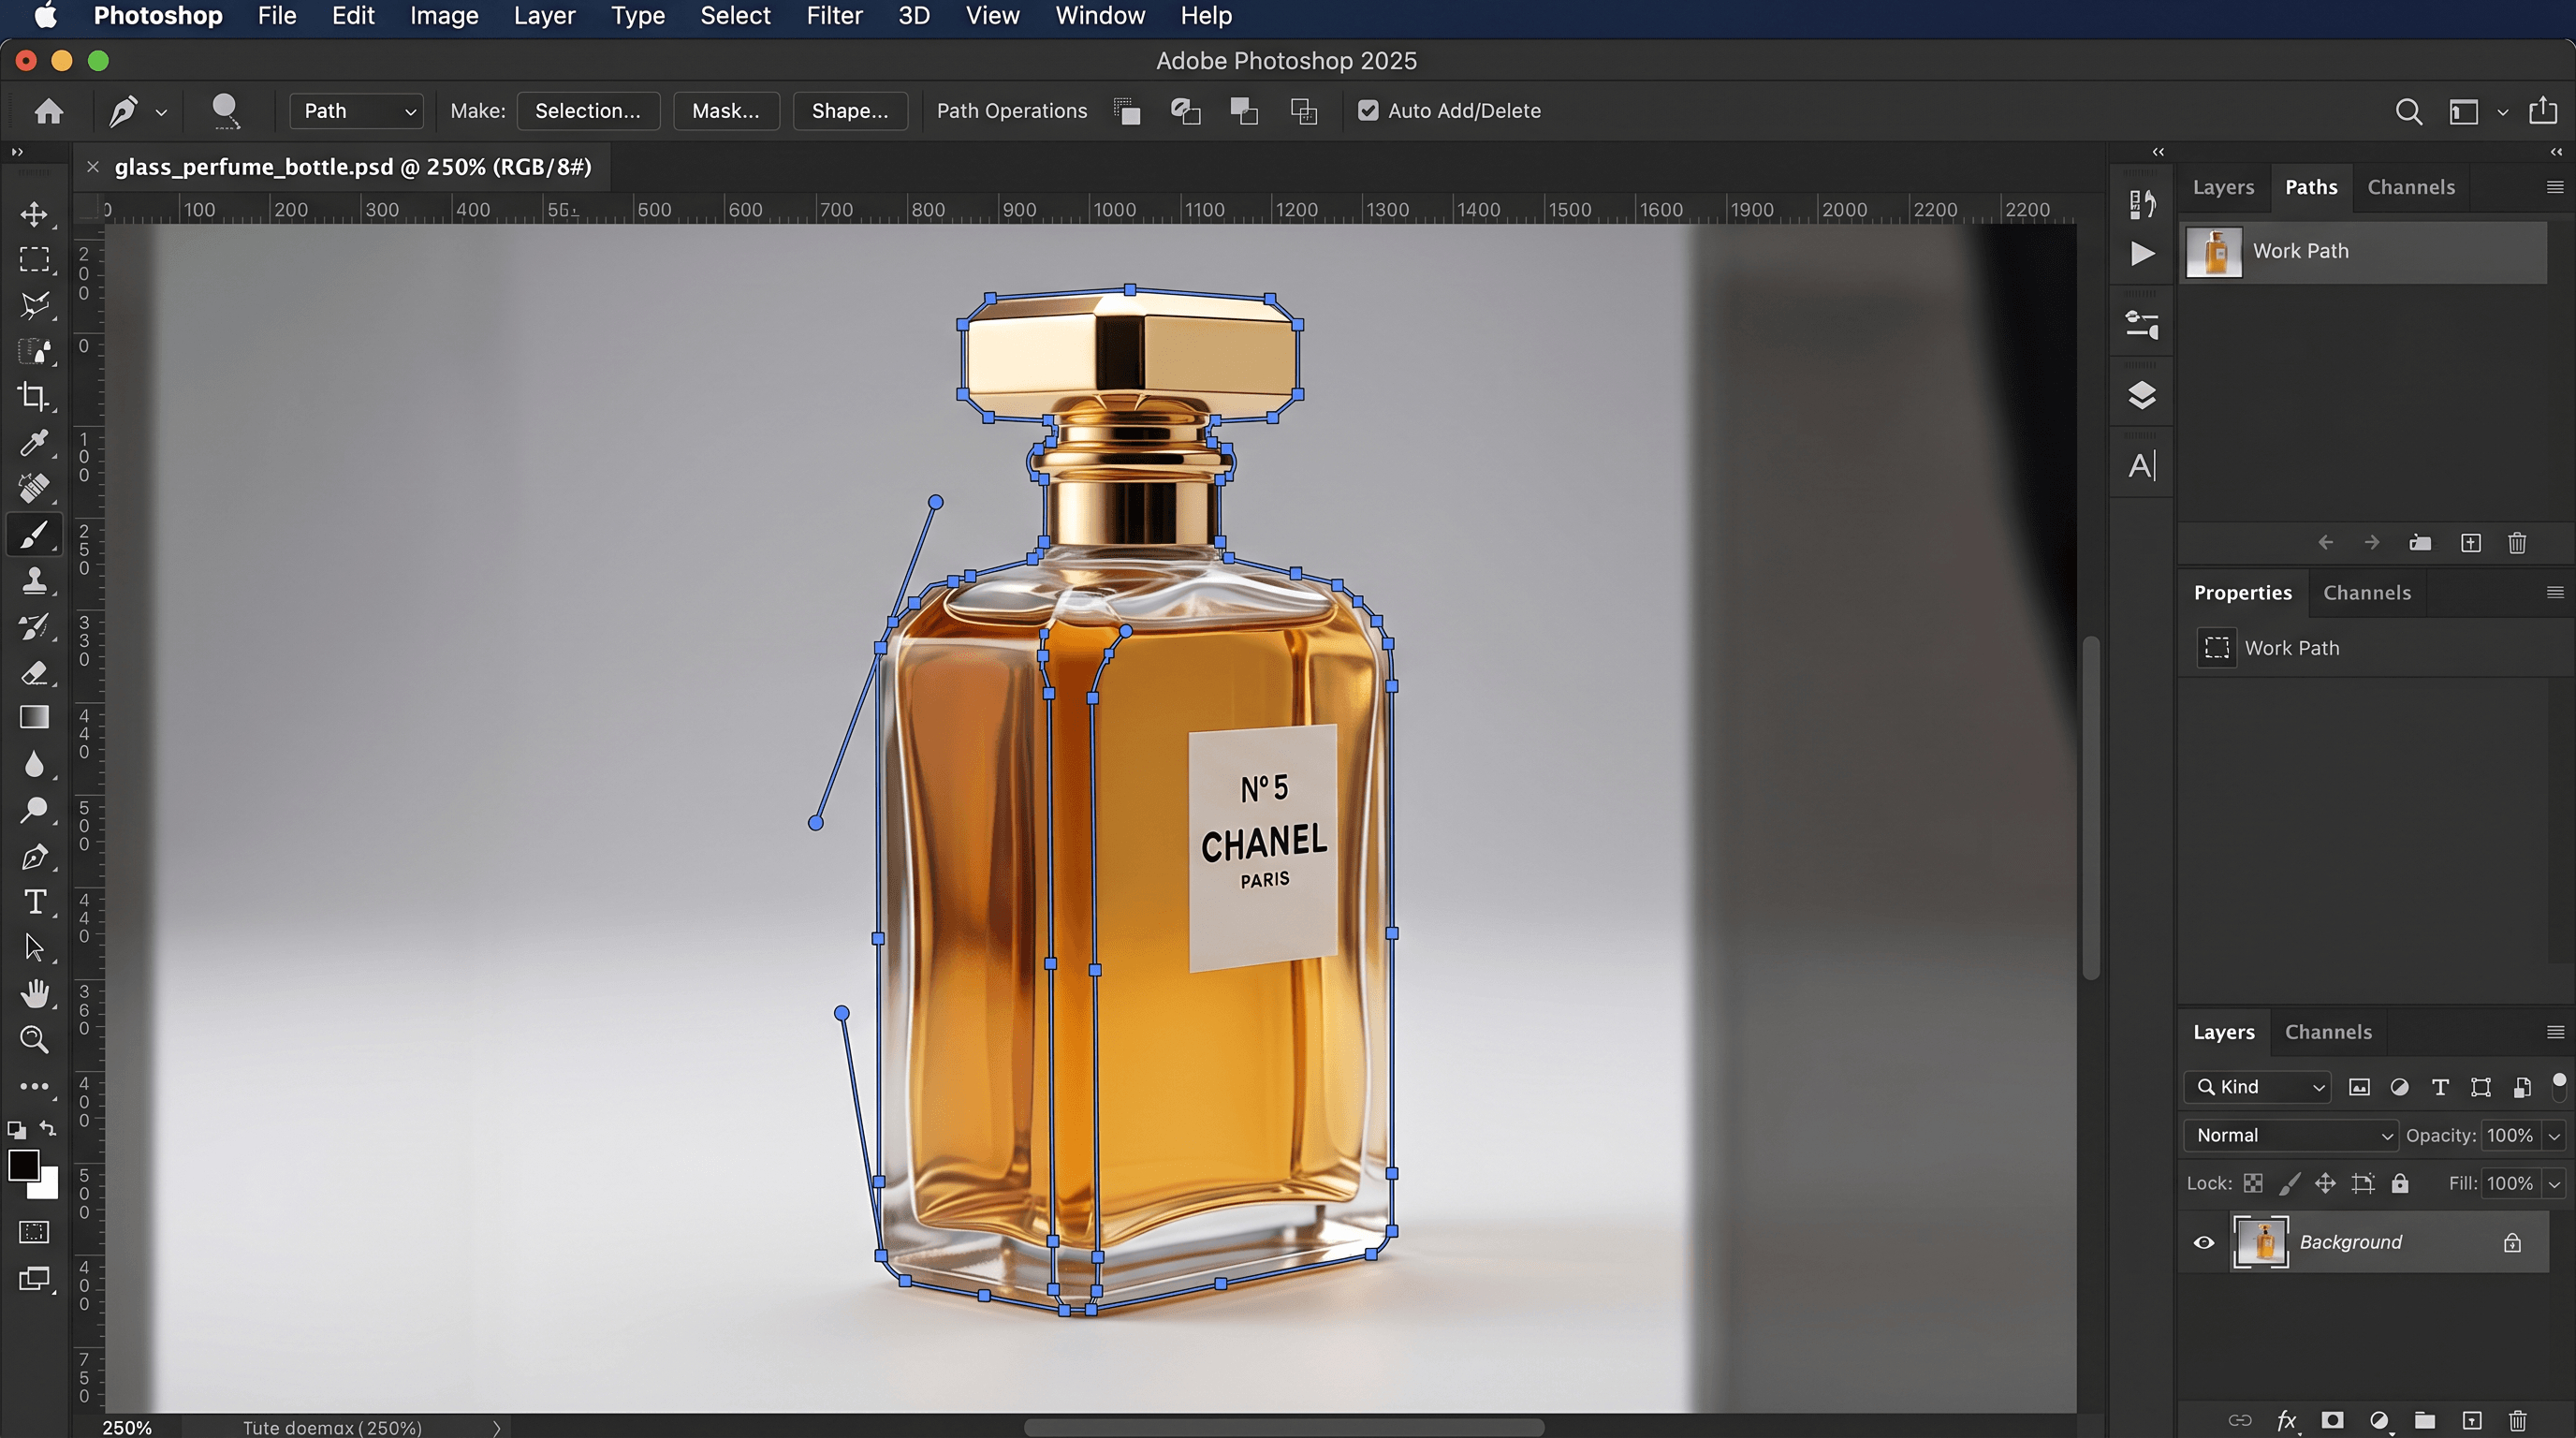
Best for: Hard-edged products (bottles, packaging, electronics, jewelry), architectural photography, anything that will be enlarged for print.
Where it fails: Hair, fur, fabric edges, motion blur — anything soft. Expect 20–60 minutes per image, longer for complex shapes. The Pen Tool also has the steepest learning curve in this list; most beginners need 5–10 hours of practice before paths start to feel natural.
If hard-edge precision is the only reason you're still in Photoshop, Imgezy's AI editor handles 95% of product cutouts at the same edge quality in roughly 5 seconds — describe what to remove and the model isolates the subject. The Pen Tool is still the gold standard for the last 5%, but it stops being the default tool for routine work.
Method 4 — Select Subject Photoshop + Select and Mask
Select Subject is Photoshop's built-in AI background remover. One click identifies the main subject of the photo, and Select and Mask gives you the controls to refine the edge — especially the Refine Hair tool, which is the closest Photoshop comes to handling hair the way a dedicated AI tool does.
Where to find it: Top menu → Select → Subject. Then Select → Select and Mask.
How to use Select Subject step by step
- Open your photo and duplicate the layer.
- Click Select → Subject. Wait 2–4 seconds for Photoshop's AI to analyze the image.
- Open Select and Mask (
Cmd/Ctrl + Alt + R). The view changes to a refinement workspace. - Choose a View Mode (top right) — "Onion Skin" or "On Layers" makes edges easier to see than the default Marching Ants.
- Use Refine Hair (the figure-with-hair icon in the toolbar). Brush along hairline edges. Photoshop runs an additional AI pass on those strands.
- Adjust Global Refinements: Smooth 2–4, Feather 0.5 px, Contrast 10–25, Shift Edge -10% to -25% to remove background fringe.
- Decontaminate Colors — check this box to neutralize background color bleed in fringe pixels.
- Output to: Layer Mask so the original layer stays intact.
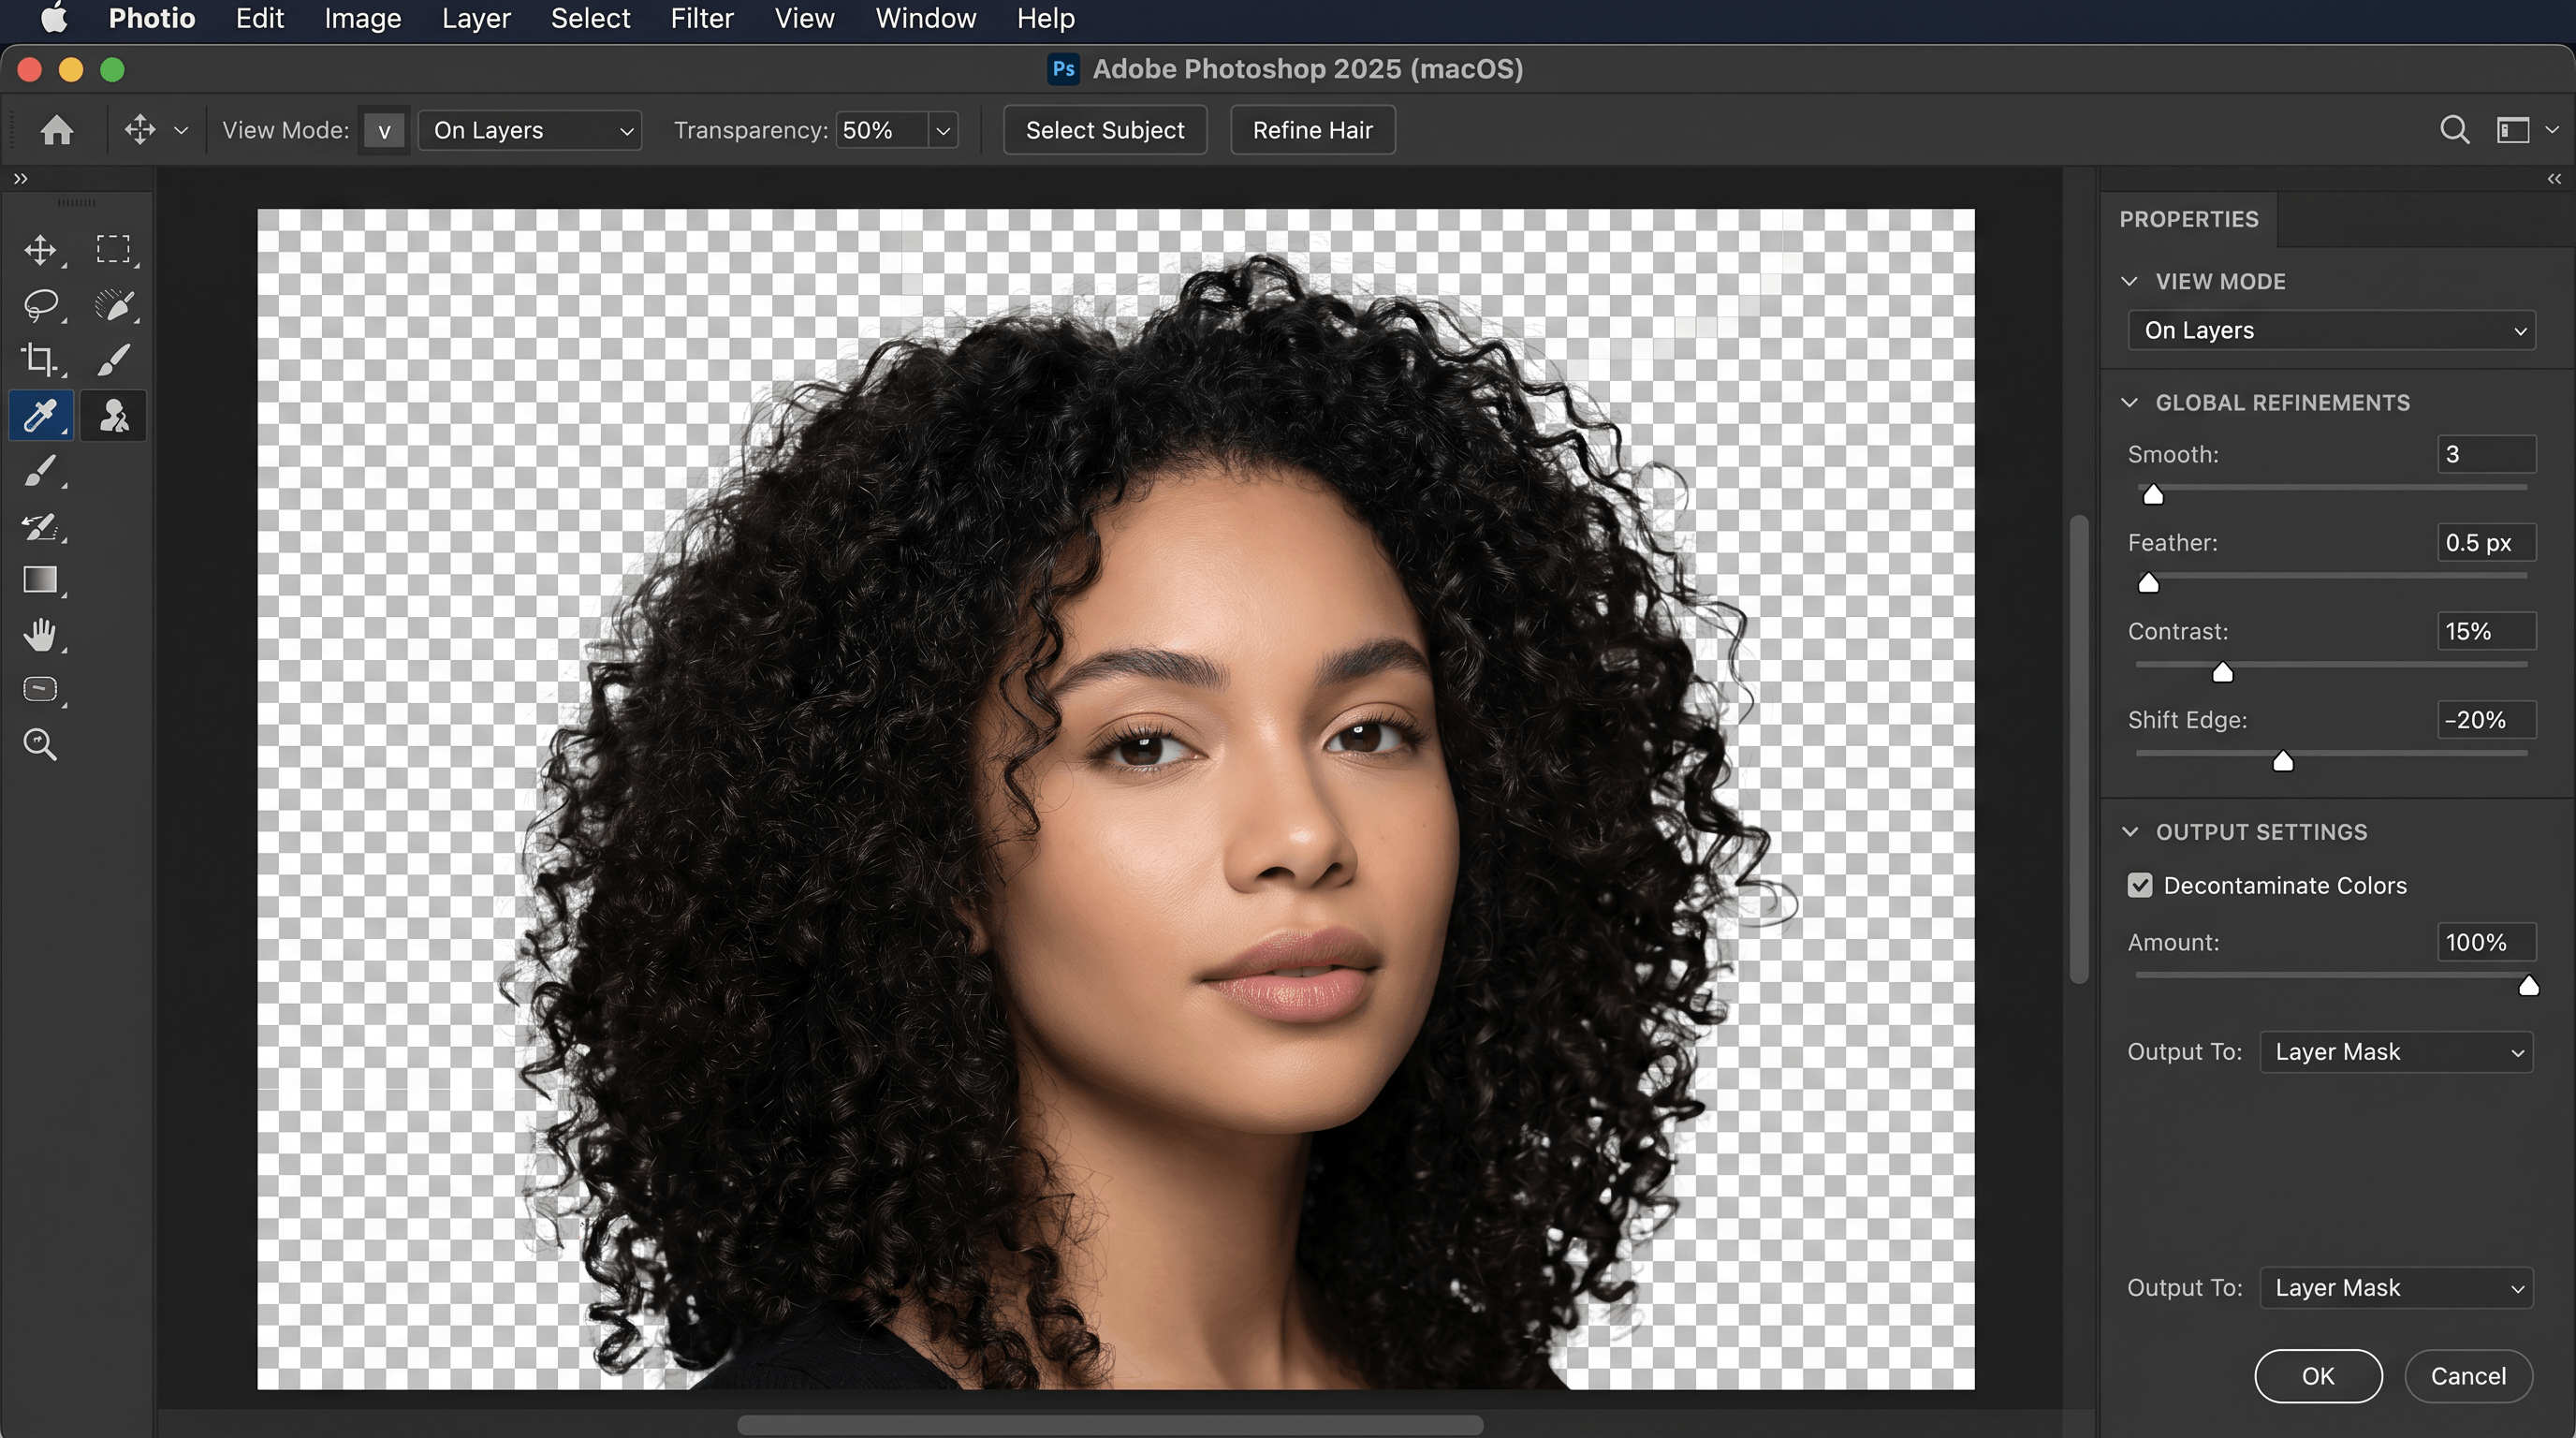
Best for: Portraits with visible hair, pets, anyone wanting a fast first-pass selection without brushwork.
Where it fails: Multiple overlapping subjects (the AI picks the most prominent one), busy backgrounds where the subject and surroundings share tones, and any case where the subject extends past the photo's edge. Even with the Refine Hair tool, expect 5–15 minutes of cleanup on tough images. Select Subject Photoshop has improved every version since 2020, but it still doesn't match dedicated AI background remover tools that train on millions of subject masks specifically.
Photoshop vs AI background remover
The honest comparison: Photoshop wins on control and pixel-perfect edges. An AI background remover wins on speed, consistency, and the cases Photoshop struggles with — hair, fur, and complex transparency. For most workflows in 2026, the right answer is "use both, depending on the job."
| Factor | Photoshop (any of the 4 methods) | AI Background Remover |
|---|---|---|
| Time per image | 5–60 minutes | 5–10 seconds |
| Skill required | Medium to advanced | None |
| Learning curve | 5–20 hours | None |
| Hair / fur | Refine Hair, manual cleanup needed | Trained specifically for it |
| Hard product edges | Pen Tool = pixel-perfect | Excellent for 95% of products |
| Batch processing | Photoshop Actions or scripting | Built-in (most AI tools) |
| Cost | $22.99 / month (Photography plan) | $0–20 / month |
| Output flexibility | Full layered PSD | PNG with transparency |
| Best for | Print, retouch, composite work | Web, social, e-commerce, batch |
In our internal test of 60 photos (20 product shots, 20 portraits with hair, 20 mixed scenes), Photoshop's Select Subject + manual cleanup averaged 8 minutes per image with 92% acceptable results on the first pass. The same photos run through an AI background remover averaged 6 seconds per image with 89% acceptable results — and the failure cases on each side were different (Photoshop missed translucent hair, AI missed reflective surfaces).
Translation: if you process more than 5 images a week, AI saves more time than it costs in occasional rework.
Imgezy: a 3-step AI alternative
If you want a faster way to remove a background without leaving the browser, Imgezy is built around three actions: upload, describe, download. It uses the same kind of generative model under the hood as Adobe Firefly, but skips the Photoshop interface entirely.
)
How it works
- Upload your photo. Drag a JPG, PNG, or WebP into the editor — files up to 20 MB process at full resolution.
- Describe the edit. Type "remove background" — or get more specific, like "remove background and keep the subject's shadow" or "replace background with a neutral grey studio."
- Download the result in 5–10 seconds. PNG with transparency is the default. You can re-prompt for a different background or further edits — no separate tool to learn.
In our testing, the same portrait that took 8 minutes in Photoshop's Select and Mask finished in roughly 6 seconds in Imgezy. The hair edges held up at 100% zoom — fine flyaways visible, no white halo, no decontamination step needed. That tracks with what other browser-based AI editors are producing in 2026, but Imgezy bundles object removal and background replacement in the same prompt box, which removes a step versus tools that split those into separate features.
Where it still falls short: Highly reflective surfaces (mirrored sunglasses, polished metal, glass with branding), anything where the subject and background share unusual textures (a leopard against a leopard-patterned couch), and final print work that demands hand-tuned masks. For those, the Pen Tool is still the right answer — but it's now the exception, not the default.
If you also want to clean up other parts of the image — power lines, photobombers, signage — see our walkthrough on how to remove objects from photos using AI. And if you're considering switching off Adobe entirely, our roundup of the best free Photoshop alternatives covers the editors that ship with AI background removal built in.
Which method should you use?
Match the photo to the tool. Here's the decision framework that works for most professionals:
- Solid background, clean edges → Magic Wand (30 seconds).
- Soft edges, simple subject → Quick Selection (2–5 minutes).
- Hard product edges, print work → Pen Tool (15–60 minutes).
- Hair, fur, fast portraits → Select Subject + Select and Mask (3–10 minutes).
- High volume, web output, anything time-sensitive → AI background remover (5–10 seconds).
Most working designers use 2–3 methods per project. The skill isn't memorizing every tool — it's recognizing which photo deserves which method.
FAQ
How do I remove the background in Photoshop without losing quality?
Always work on a duplicated layer and output your selection to a Layer Mask, not a deleted background. A layer mask is non-destructive, which means you can adjust the cutout later without redoing the work. For the cleanest edges, run any selection through Select and Mask with Decontaminate Colors enabled to remove background color bleed.
What's the difference between Photoshop's Background Eraser and the methods above?
The Photoshop Background Eraser is a brush that erases pixels as you paint — it's destructive and works by sampling the color directly under the crosshair. It can be useful for narrow edge cleanup, but it's slower and harder to control than the Pen Tool for hard edges or Select Subject for soft edges. Most modern Photoshop background removal workflows skip the Background Eraser entirely.
Can I batch remove backgrounds in Photoshop?
Yes, with Photoshop Actions or a script. Record a Select Subject + Layer Mask + Save action, then run File → Automate → Batch on a folder. Quality varies by image since Select Subject is per-photo. For higher reliability across mixed images, a dedicated AI background remover with a built-in batch queue is usually faster than maintaining a Photoshop Action.
How do I export a transparent PNG after removing the background?
After your subject is on a layer with a layer mask, hide all background layers. Go to File → Export → Quick Export as PNG (or File → Save As, choose PNG, and check "Transparency"). The exported PNG keeps the alpha channel from your layer mask. Don't flatten the image first — flattening removes transparency.
Will an AI background remover lose detail compared to Photoshop?
Sometimes — but rarely on the parts that matter. Modern AI background removers handle hair and soft edges better than Photoshop's Quick Selection or Magic Wand. They lag behind Photoshop's Pen Tool on perfectly hard edges (jewelry, watches, packaging) and on reflections. For 80–90% of photos, the AI output is indistinguishable from a careful Photoshop cutout when viewed at normal zoom.
Is the free version of Imgezy enough for testing?
Free credits cover roughly 5 sample edits — enough to test Imgezy on your own photos before deciding. After that, the Basic plan is $9.99 / month for ~40 images, and Pro is $19.99 / month for ~250 images plus a commercial license. The free tier is built for evaluation, not ongoing use.
The bottom line
Photoshop still has the deepest tool kit for background removal — four reliable methods, full layer control, and pixel-perfect edges when you need them. But for the routine 80% of jobs (web product photos, social, portraits, batch work), the time cost stops making sense the moment you've used an AI background remover that finishes in 5 seconds.
The right workflow in 2026 is hybrid: AI for speed, Photoshop for control. Start every image in an AI tool, and only fall back to Photoshop's Pen Tool when the result needs that final 5% of edge precision.
Ready to skip the Pen Tool? Try Imgezy free → — remove backgrounds, swap scenes, and batch-process in seconds. Bring Photoshop in only when the photo actually deserves it.