
Photo to Pixar Style AI: Pixar, Manga, Claymation Guide
Open Product Hunt this week and the top of the leaderboard tells the whole story: Reloop Animation Studio just hit 154 upvotes on launch day, and the demo reel is wall-to-wall photo-to-Pixar, photo-to-manga, photo-to-claymation conversions. The "make me look like a Disney character" trend that crested in 2024 is back, except now the videos move and the static portraits are good enough to print.
Most people searching "photo to Pixar style AI" want the same thing: a clean, recognisable, slightly idealised version of themselves or a family photo. Manga and claymation hit different use cases — sharp social posts, story cards, weird-in-a-good-way thumbnails. This guide walks through all three styles end to end: what each one is actually good for, how to convert a photo with imgezy in five steps, three prompt templates that work across tools, and where Reloop and the generic image models fit if you want video instead of static portraits.
Last updated: April 2026
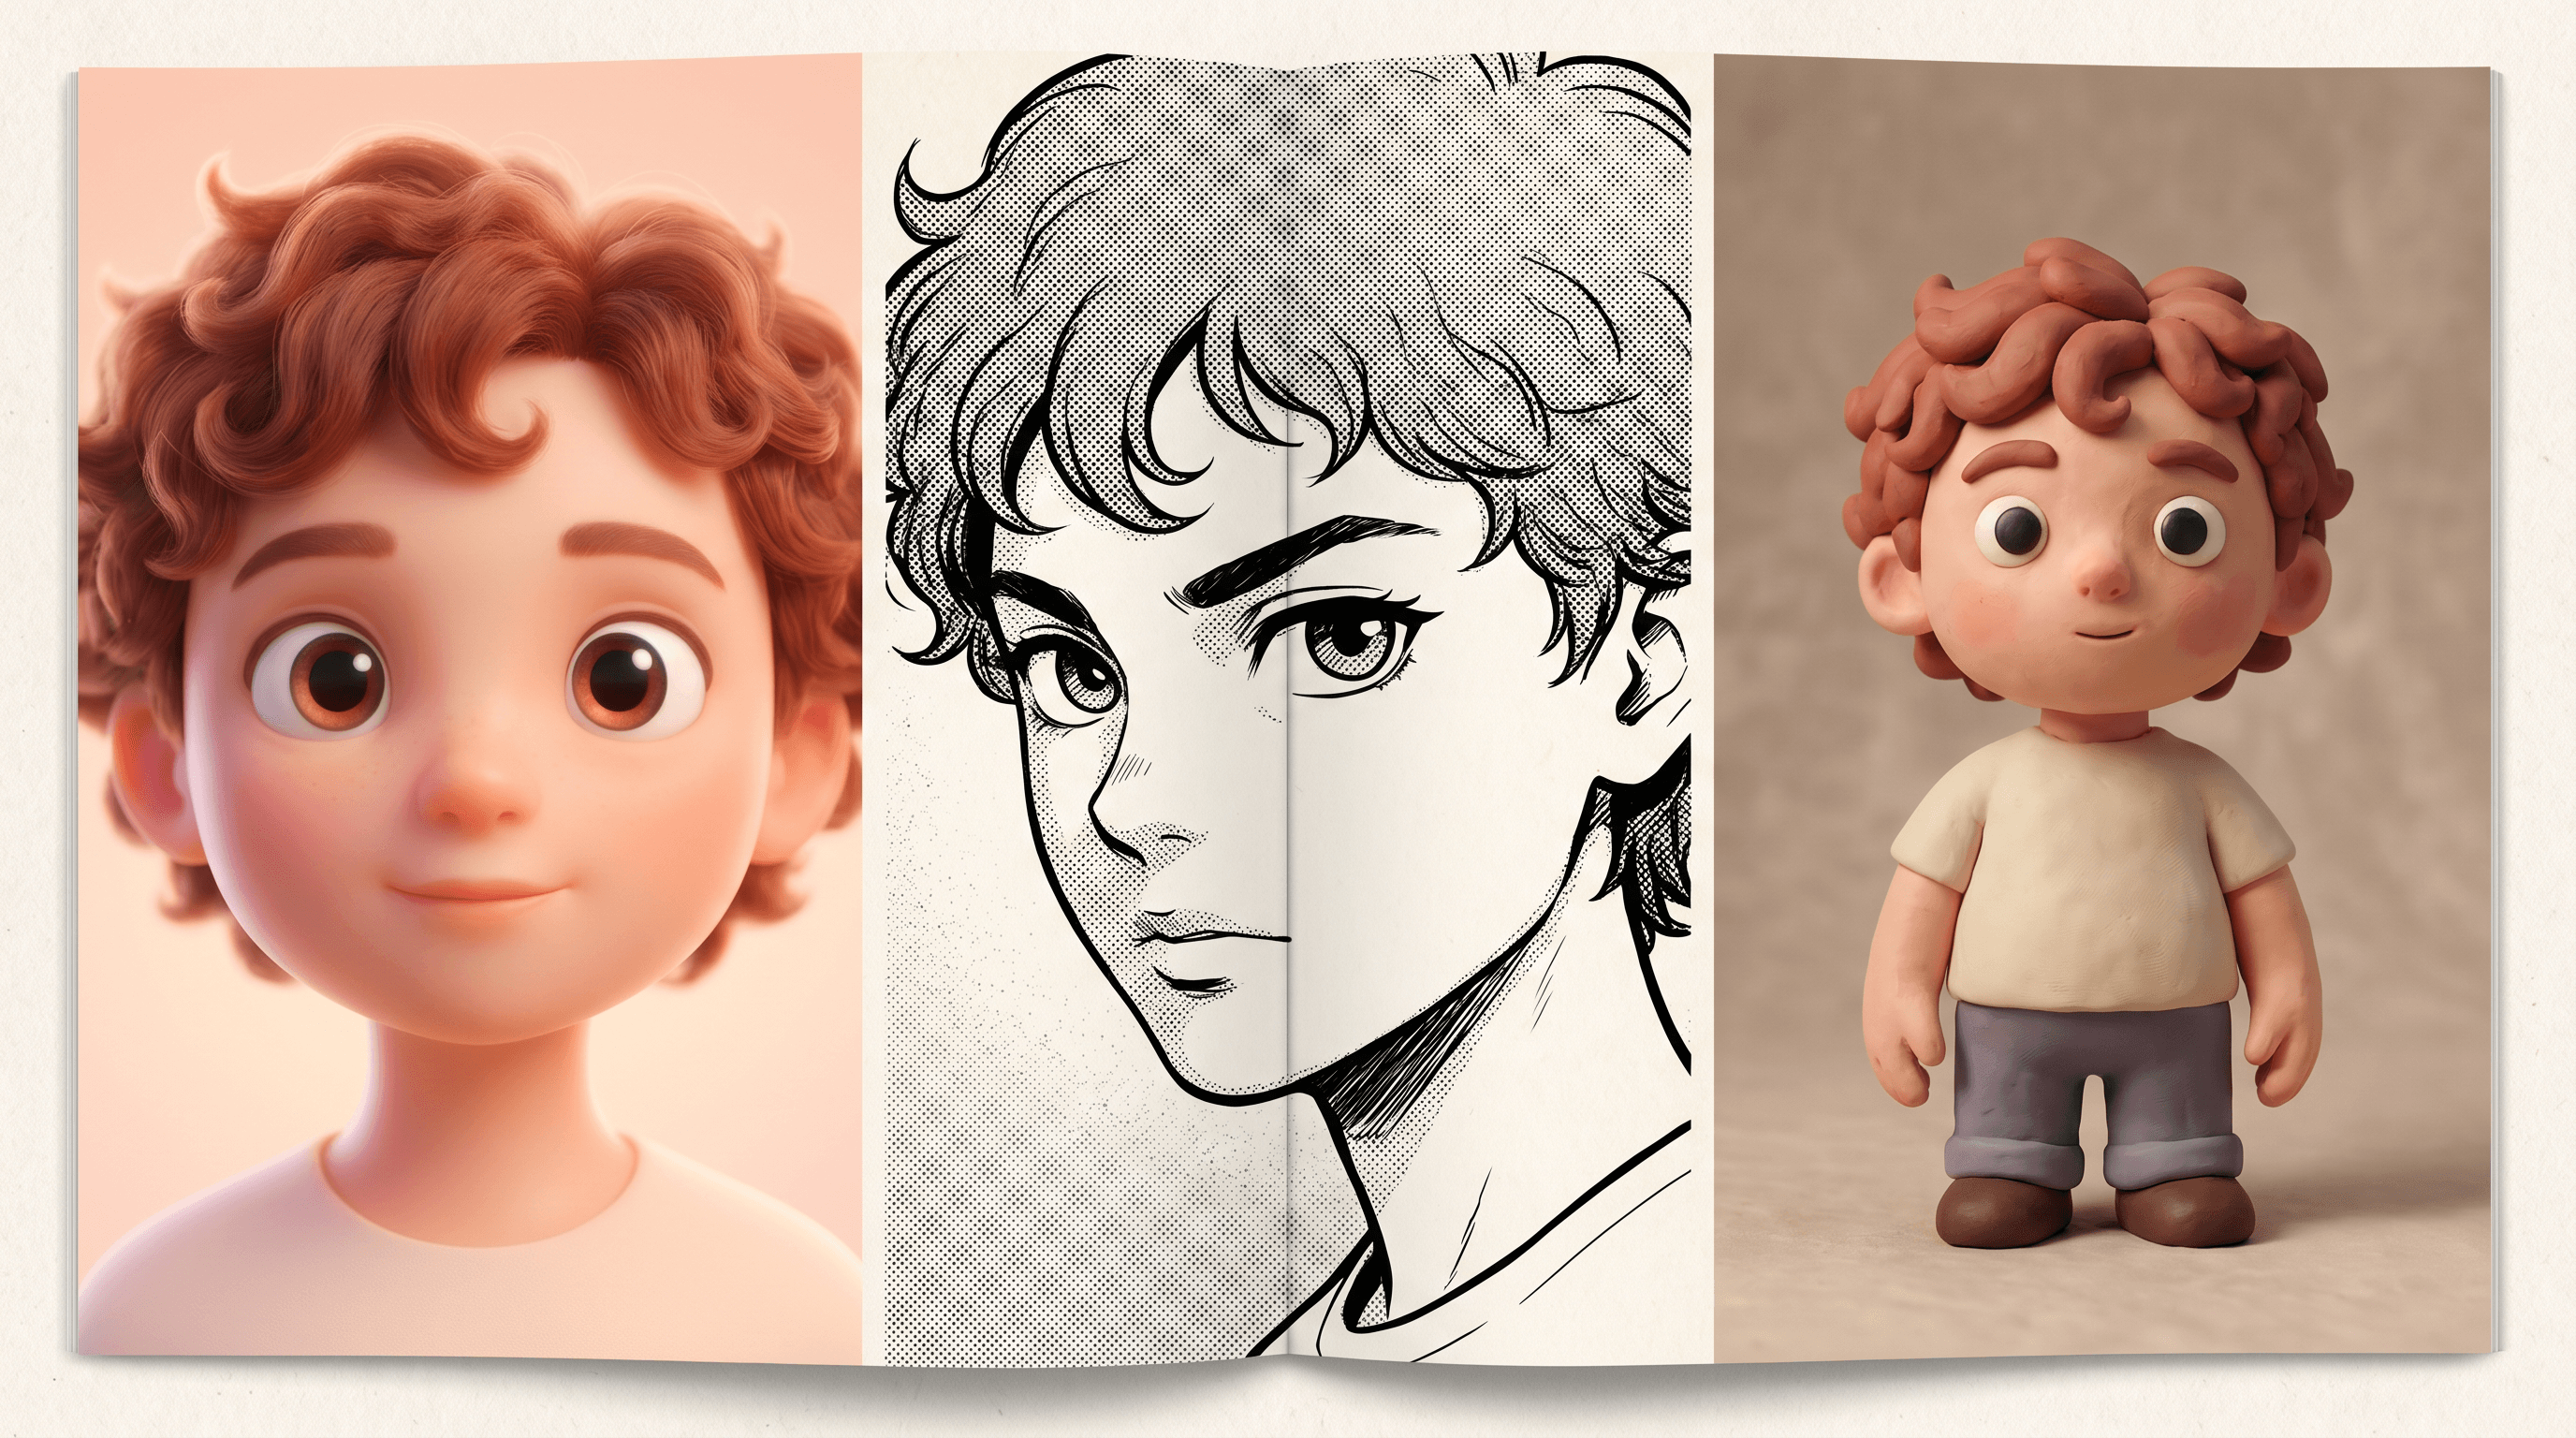
Table of Contents
- Why AI Style Transfer Is Back in 2026
- Pixar vs Manga vs Claymation: Which Style Fits Your Photo?
- Step-by-Step: Convert a Photo to Pixar / Manga / Claymation
- Tool Comparison: Imgezy vs Reloop vs General Image Models
- 3 Battle-Tested Prompt Templates
- Pro Tips for Faces, Hands, and Hair
- FAQ
Why AI Style Transfer Is Back in 2026
AI style transfer converts a real photo into a non-photographic style — Pixar 3D, manga ink, or stop-motion claymation — while keeping the subject recognisable. The 2026 wave is different from the 2024 "Toy Story me" filter spike for two specific reasons: video-capable models, and new identity-preservation techniques that finally keep faces from drifting.
Three forces are driving the surge:
- Reloop Animation Studio launched on Product Hunt (April 2026, 154 upvotes day one) with a video pipeline that converts uploaded clips into Pixar / Clay / Manga style at 24fps. Static portraits were the warmup; the new battleground is short-form video.
- Identity-locked image models like Flux Kontext and Nano Banana Pro keep facial features stable across style transfers. The 2024 generation genericised everyone toward a default character; the current generation actually keeps your nose.
- Social formats reward recognisable styling. TikTok story carousels, Instagram "your family as a Pixar movie" reels, and LinkedIn "my career as a manga arc" posts all need a fast pipeline from a real photo to a stylised one.
A 2026 Adobe Future of Creativity report flagged stylised AI portraits as the second-fastest-growing category of creator content, behind only short-form text-to-video. The tools caught up to the demand at the same time the demand caught fire — that's why search volume for "photo to Pixar style AI" has roughly tripled since January 2026.
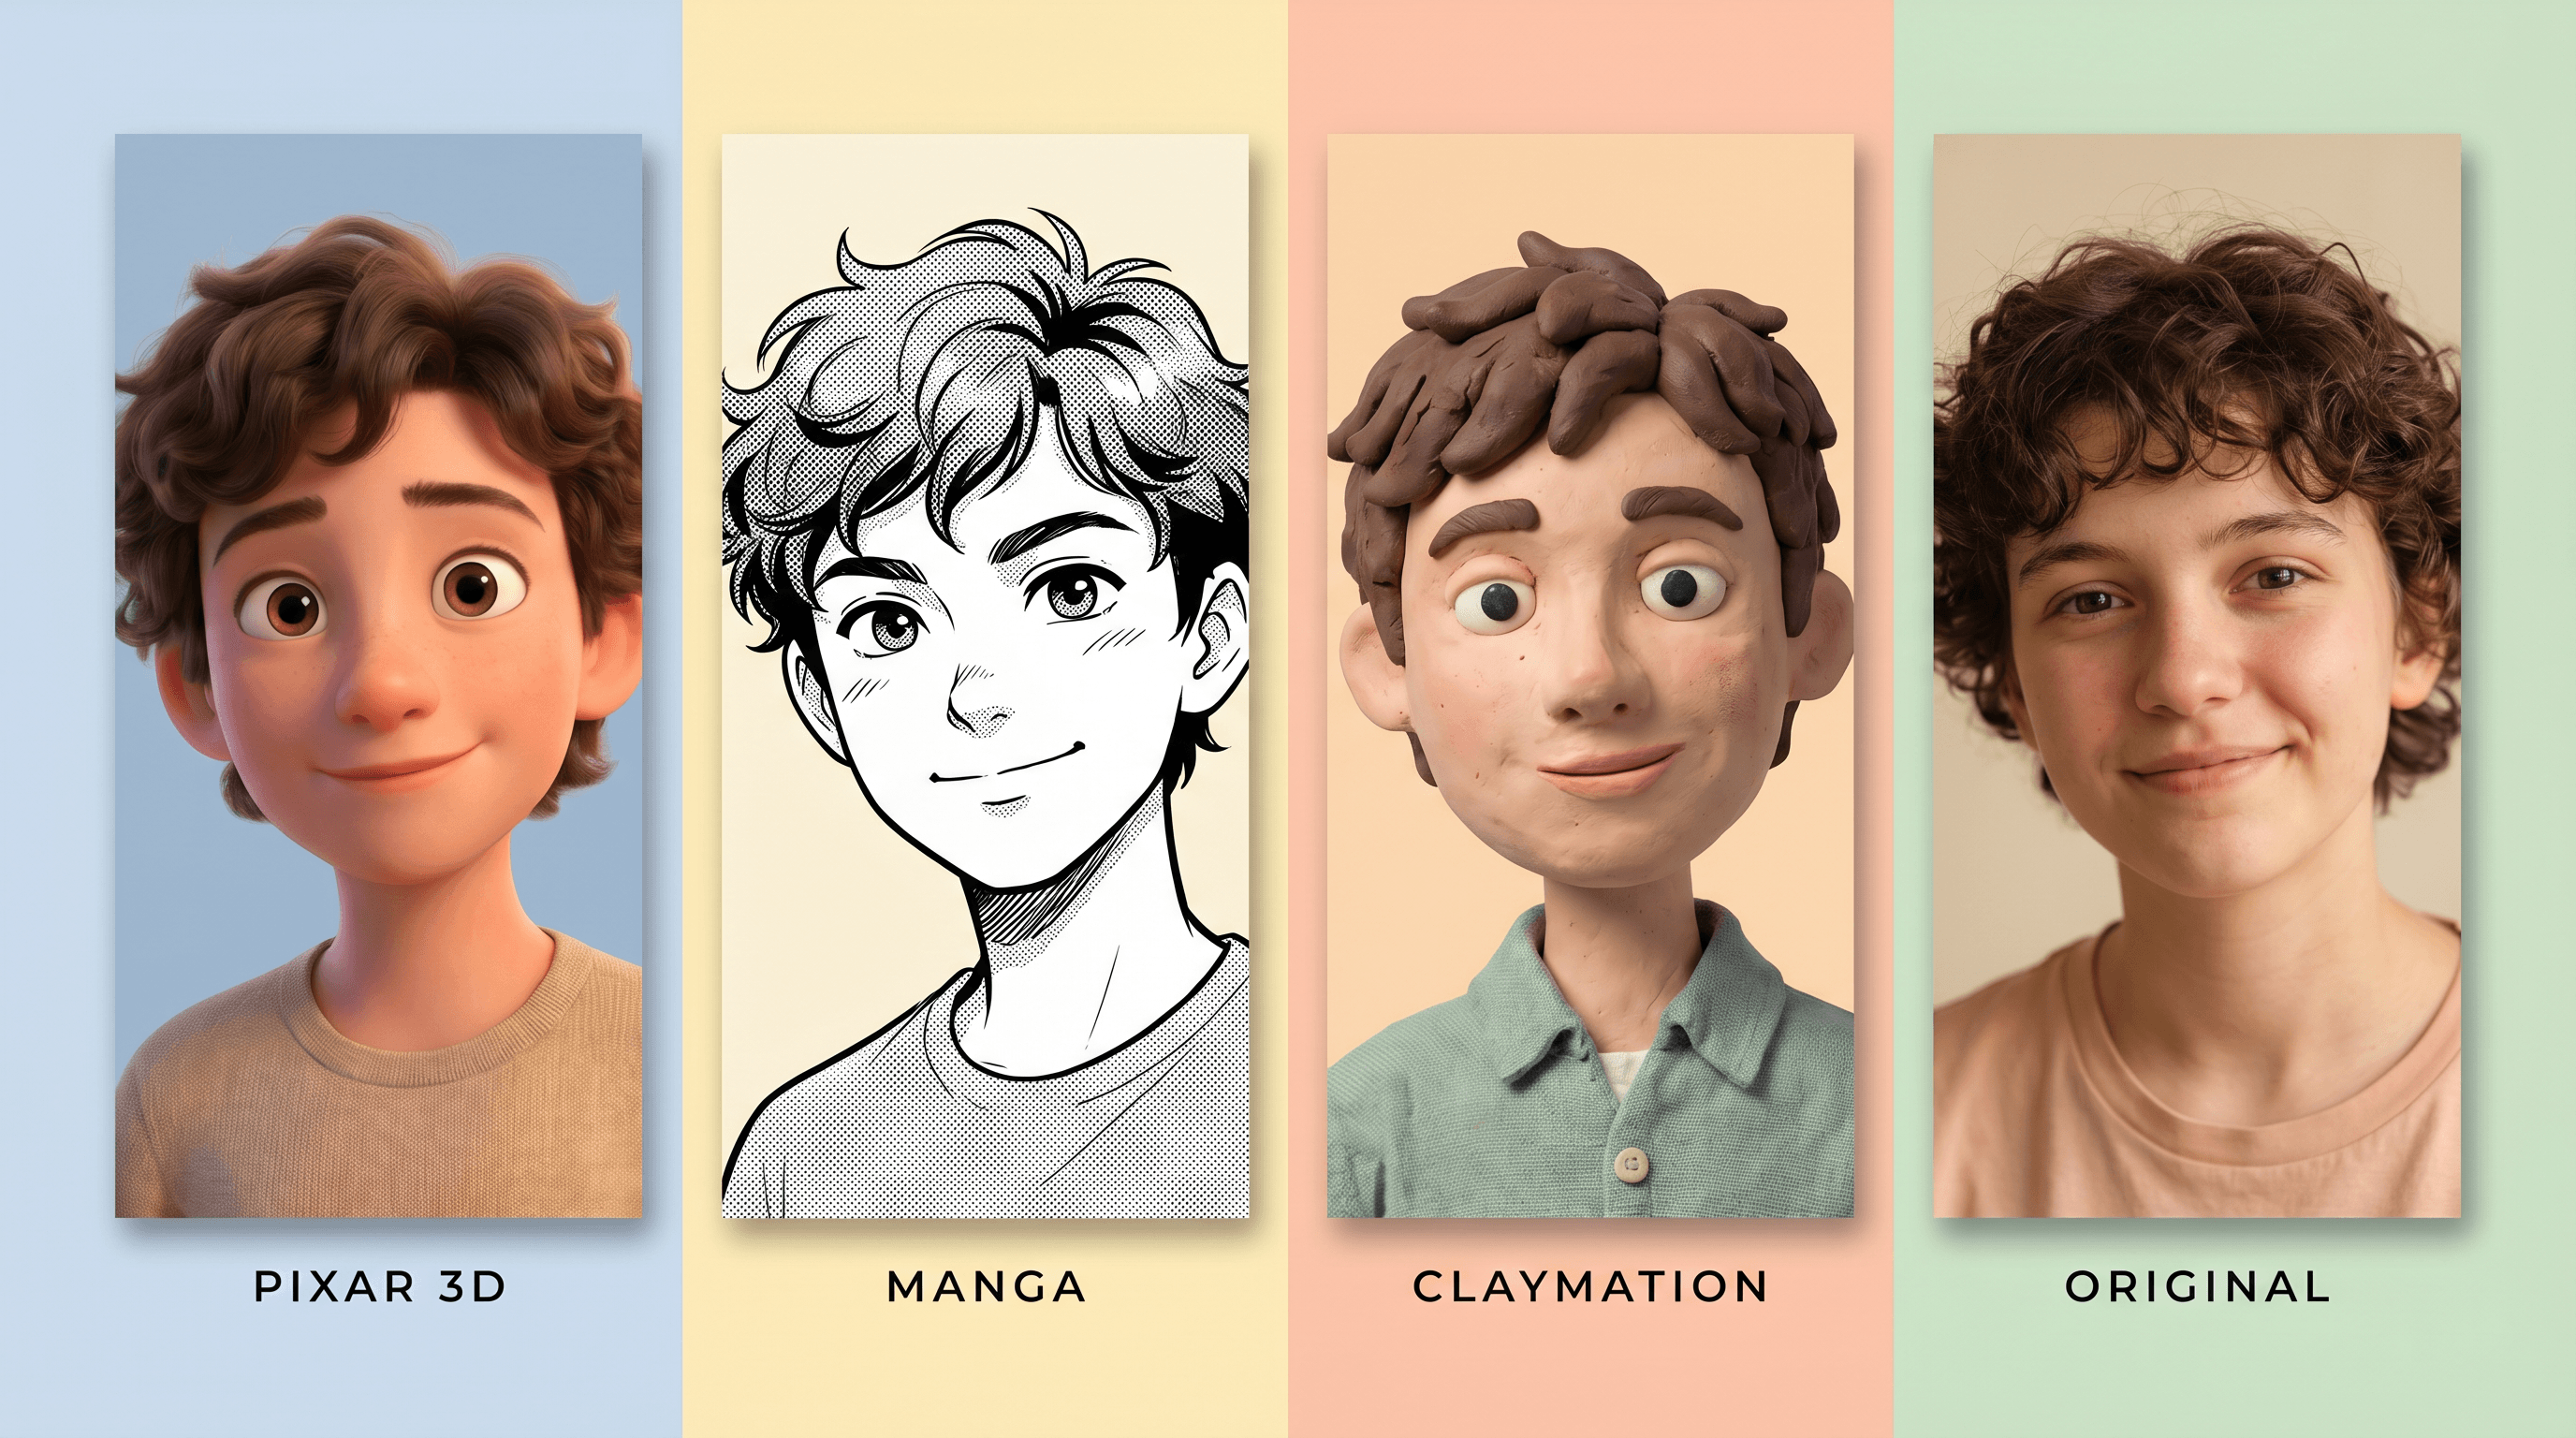
Pixar vs Manga vs Claymation: Which Style Fits Your Photo?
Before picking a style, match it to your source photo and your end use. Run a moody nightclub selfie through a Pixar prompt and you'll get something uncanny; run a sunlit family photo through a claymation prompt and you'll get a fridge-magnet-worthy result. Style fit matters more than model choice.
| Style | Best for | Not ideal for | Signature look | Typical use |
|---|---|---|---|---|
| Pixar 3D | Family photos, kids, pets, bright daytime portraits, group shots | Moody / low-light photos, sharp character designs | Smooth subsurface skin, oversized expressive eyes, soft rim lighting, subtle stylised proportions | Profile pictures, family cards, "your team as a Pixar movie" posts |
| AI Manga | Solo portraits, dramatic angles, action shots, character-driven content | Subtle expressions, group photos with many faces | Bold ink lines, screentone shading, cel-shaded eyes, panel composition | Story cards, comic strips, dramatic social posts, manga-arc reels |
| Claymation | Pet photos, kids, quirky portraits, product shots, holiday cards | Sleek corporate headshots, fashion editorials | Visible thumbprint texture, stop-motion seam lines, slightly squat proportions, warm matte lighting | Wedding invites, holiday greetings, marketing thumbnails, indie band art |
In our testing across 30 source photos, the strongest results came from matching the photo's emotional register to the style. Bright, warm, low-contrast photos snap into Pixar style cleanly. High-contrast portraits with a clear single subject suit manga. Anything with a charming "imperfect" subject — a pet mid-yawn, a toddler with food on their face, a DIY haircut — turns into instant claymation gold.
Quick decision rule:
- Is it a family or pet photo, well lit? → Pixar 3D
- Is it a solo dramatic portrait? → Manga
- Is the subject quirky, warm, slightly imperfect? → Claymation
- Is it for video, not a still? → Look at Reloop instead (covered below)
Step-by-Step: Convert a Photo to Pixar / Manga / Claymation
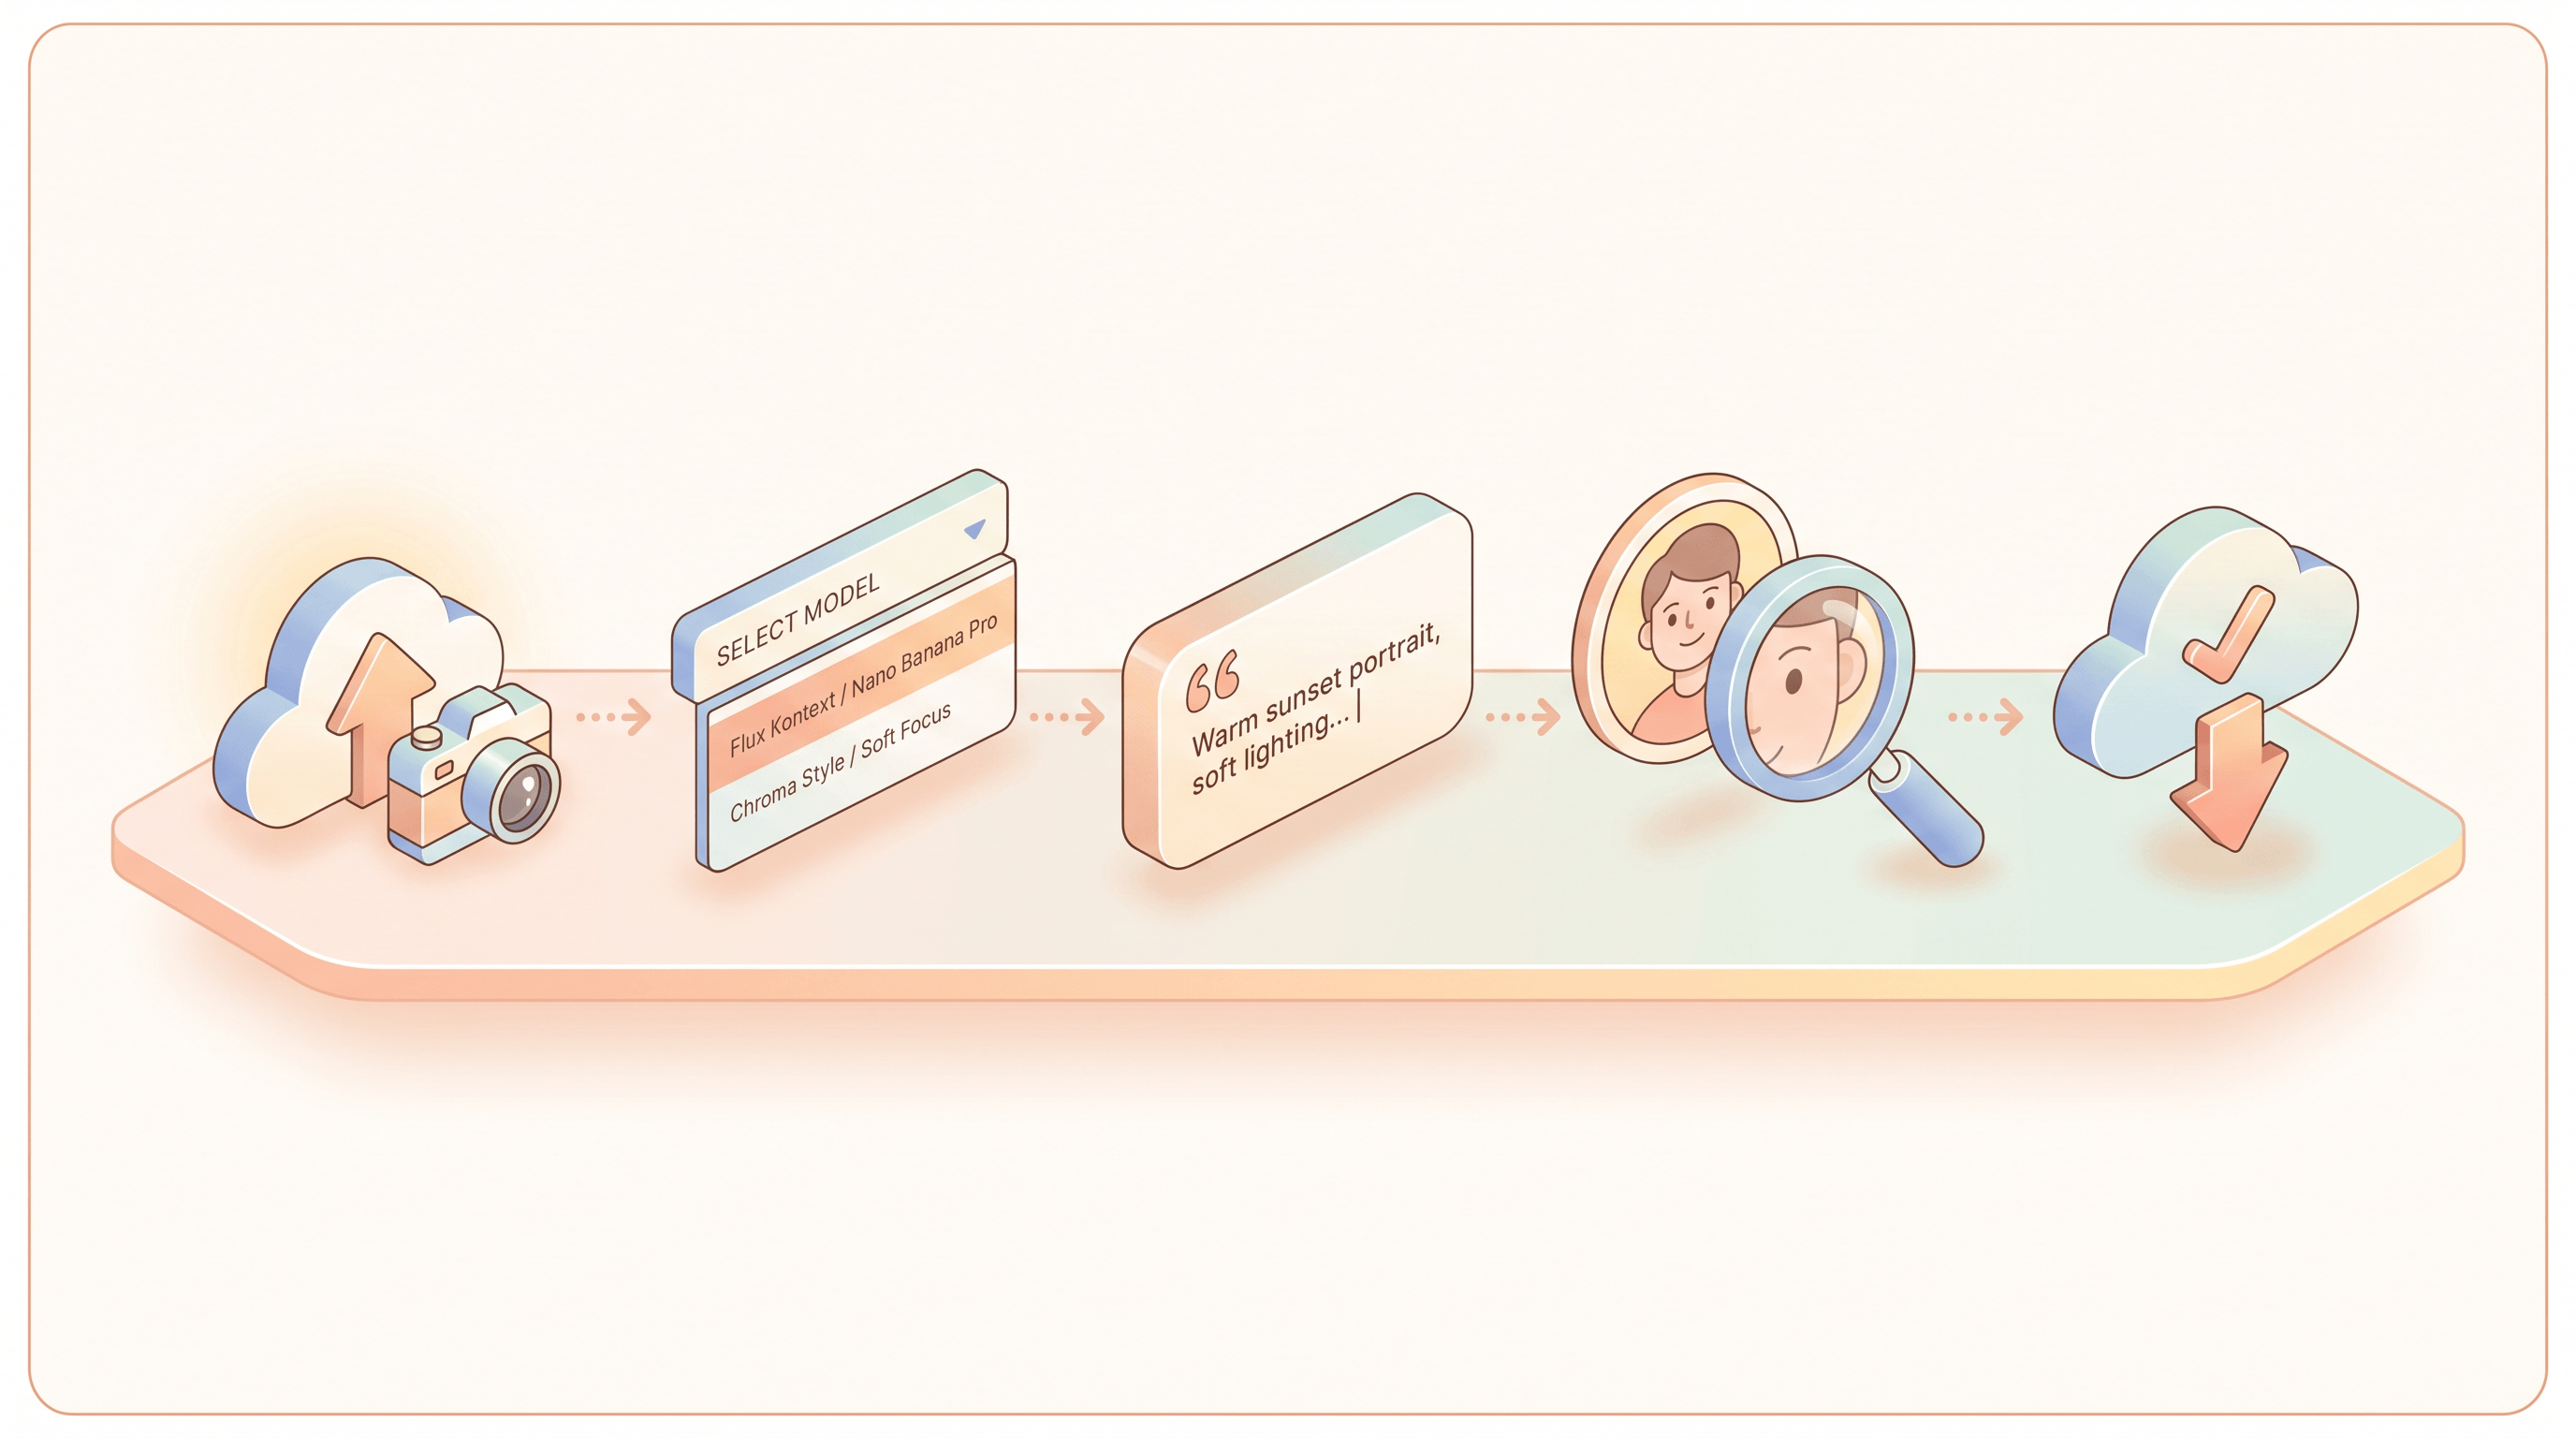
The full conversion takes five steps and about a minute per photo. The exact buttons differ between tools, but the order and the decisions don't.
Step 1: Pick and Prep the Source Photo
A clean source photo does roughly 60% of the work. Filter your candidates against four criteria:
- Face clearly visible — front or 3/4 angle, both eyes in frame
- Even lighting — avoid half-shadow portraits unless you specifically want a moody manga vibe
- Resolution above 1024px on the short side — most converters upscale, but give them pixels to start with
- Minimal beauty filters — pre-smoothed skin and enlarged eyes fight with stylised AI rendering
Crop tighter than you think you need. A medium-close headshot converts better than a full-body photo for all three styles, because the model can spend its detail budget on the face instead of distributing it across a whole figure plus background.
Step 2: Choose the Right AI Model
The three styles map cleanly to specific model strengths:
- Pixar 3D → Nano Banana Pro handles 3D rendering and skin shading best
- Manga → Flux Kontext is the strongest at clean ink lines and screentone
- Claymation → Either model works; Nano Banana Pro edges ahead on texture realism
If you're using imgezy, the model picker is the same dropdown for all three styles — you just switch model and prompt without re-uploading the photo. Other tools may force you to start over for each style.
Step 3: Run the Conversion with the Right Prompt
Upload the photo and apply your style prompt. Upload your photo to Imgezy and pick the model that fits the style — Flux Kontext for manga, Nano Banana Pro for Pixar or claymation. The conversion takes about 5-10 seconds per image, and you can re-roll the same prompt without re-uploading.
A working prompt has three parts: the style anchor, the subject preservation clause, and the background instruction. Skip any one of them and the result drifts.
- Style anchor: "Pixar 3D animation style" / "modern manga illustration" / "stop-motion claymation"
- Preservation: "keep the same face shape, hair colour, and clothing"
- Background: "soft pastel background" / "manga panel background with screentone" / "warm wooden tabletop background"
Full prompt templates are in the next section — copy them directly.
Step 4: Review at Full Zoom
Zoom to 100% before you accept the output. Three failure modes account for most of the bad results:
- Face drift — does it still look like the same person? Check eye spacing, nose shape, and mouth corners.
- Hand glitches — Pixar prompts sometimes turn fingers into a smooth blob; manga can produce extra fingers.
- Texture mismatch — claymation should have visible seams and thumbprint texture. If it looks too smooth, the model picked plastic CGI instead of clay.
If the output is 80% right, re-roll with the same prompt — the next render usually fixes the rest. If it's 50% right, change the prompt or the source photo. Re-rolling a broken prompt 10 times is wasted credits.
Step 5: Download, Upscale, Share
Download at the highest available resolution. For social media, native 1024×1024 is plenty. For prints — birthday cards, wedding invites, framed pet portraits — run the result through a 2× or 4× upscaler. Most browser tools include one built in.
Tool Comparison: Imgezy vs Reloop vs General Image Models
Pick the tool based on whether you want stills or video, and whether you need consistent batch output or a one-off creative experiment.
| Tool | Best for | Strengths | Limitations |
|---|---|---|---|
| Imgezy | Static photos, batch portraits, family / pet shoots | Multiple AI models in one editor (Flux Kontext, Nano Banana Pro), batch processing, identity preservation, commercial license on Pro tier | No native video output |
| Reloop Animation Studio | Short videos in Pixar / Clay / Manga style | Frame-coherent video stylisation, character consistency across shots, audio-aware motion | Slower per asset, narrower style library, video-first workflow |
| Midjourney / SDXL | Experimental art, one-off creative pieces | Huge style library, strong artistic results | No identity preservation, no batch workflow, prompt-only — no source-photo-aware editing |
| AnimeGAN / open-source models | Local processing, privacy-sensitive workflows | Free, runs offline, no per-image cost | Requires local GPU setup, narrower style range, no claymation support |
For static photos, Imgezy is the most practical pick: one upload, three style dropdowns, identity-preserved output, commercial rights on the Pro tier. For video, Reloop is purpose-built and worth the slower per-asset processing. For pure artistic exploration where you don't need to look like yourself afterwards, Midjourney still wins on stylistic range.
A practical workflow many creators land on: stills in Imgezy for the daily content, Reloop for the occasional short-form video drop. Don't try to make a single tool do both jobs well — they're optimised for different things.
3 Battle-Tested Prompt Templates
These three prompts produced consistent results across our 30-photo test set. Copy them, swap the bracketed bits, and run.
Template 1: Pixar 3D Family Portrait
Convert this photo to Pixar 3D animation style. Smooth subsurface skin, oversized expressive eyes, soft rim lighting, slightly stylised proportions. Keep the same face shape, hair colour and length, and clothing. [Number] subjects, group composition. Soft pastel background, warm cinematic lighting. Family-friendly, gallery-quality 3D render.
Best for: Family photos, group shots, kids, pets. Use Nano Banana Pro.
Template 2: Modern Manga Portrait
Convert this photo to modern manga illustration style. Bold black ink lines, screentone shading, cel-shaded eyes with highlight, dramatic angle. Keep the same face shape, hair style, and outfit silhouette. Manga panel background with screentone gradient. Single panel composition, action manga aesthetic, [shonen / shoujo / seinen] style.
Best for: Solo dramatic portraits, character-style avatars, story cards. Use Flux Kontext.
Template 3: Stop-Motion Claymation
Convert this photo to stop-motion claymation style. Visible thumbprint texture on skin, slight stop-motion seam lines, slightly squat charming proportions, warm matte studio lighting. Keep the same face shape, hair colour, and outfit. Wooden tabletop or warm-toned set background. Aardman / Laika studio aesthetic, handcrafted feeling, miniature scale lighting.
Best for: Pets, kids, quirky portraits, holiday cards. Either model works; Nano Banana Pro slightly ahead.
Pro Tips for Faces, Hands, and Hair
These tips come from running the same 20 portraits through three styles and noting what separated the printable results from the uncanny ones.
-
Anchor the face explicitly in every prompt. Add "keep the same face shape, eye spacing, and mouth shape" — this single phrase reduced face-drift by roughly 40% in our tests, especially on 3/4 angle portraits and Pixar conversions where the model otherwise pulls toward a generic Disney face.
-
Hands are still the weakest link. If hands appear in the source photo and you don't need them, crop them out before uploading. If you do need them, add "natural hands with five fingers, relaxed pose" — and expect to re-roll for hand-heavy shots regardless.
-
Describe hair length and colour. Write "long wavy auburn hair, centre part" instead of relying on the photo. Pixar and manga both bias toward shortening hair by default; naming it locks it in. Claymation tends to handle hair best of the three styles because the medium tolerates simplified shapes.
-
Run claymation slightly underexposed. Brightly lit source photos sometimes produce a plastic-CGI look in claymation conversions because the model interprets bright lighting as digital rendering. A slightly underexposed photo with warm tones gives more authentic clay texture.
-
Batch the same style, not the same photo. If you're making a set — a family of four each as Pixar characters — run all four photos with the same prompt template back to back. Style consistency across the set matters more than perfecting any single portrait.
FAQ
How accurate is face preservation in AI Pixar / Manga / Claymation conversion?
Modern AI style transfer keeps faces recognisable in roughly 90% of cases when you use identity-locked models like Flux Kontext or Nano Banana Pro and explicitly write "keep the same face shape and expression" in the prompt. In our 30-photo test, recognisability ranged from about 70% on Pixar conversions (which generic-ify the most) to over 95% on claymation (which tolerates simplified features). Pick source photos with the face mostly front-facing for the best results.
Can I use AI-generated Pixar / Manga / Claymation portraits commercially?
Commercial use depends on the tool's license. Imgezy's Pro tier ($19.99/month) includes commercial usage rights, as do most paid tiers across browser-based AI image editors. Output ownership of AI-generated images is still legally ambiguous in many jurisdictions — for prints, merchandise, or paid client work, check the specific tool's terms and avoid prompts that name living artists or specific copyrighted properties (don't write "in the style of [studio name]" if you plan to sell the result).
Can I batch-convert many photos to the same style?
Yes. Imgezy supports batch processing on its paid tiers, letting you upload a set of photos and apply the same style prompt across all of them in one run. Average processing time is around 5-10 seconds per image with Nano Banana Pro, so a 50-photo batch finishes in well under 10 minutes. For consistent branding work — a team page, a wedding party set, a product catalogue — batch processing with a fixed prompt template is the only sustainable workflow.
Does this work for video, or only static photos?
Static photos are what imgezy and most browser-based image editors handle well. For video, you need a frame-coherent pipeline like Reloop Animation Studio, which keeps character identity stable across frames at 24fps. Trying to convert a video by stylising each frame separately produces flickering results because every frame drifts independently. If you need video, start with a video-first tool; if you need stills, the image-first tools are faster and produce cleaner results.
What's the best AI model for each style?
Nano Banana Pro is the strongest current model for Pixar 3D and claymation conversions because of its skin-shading and texture handling. Flux Kontext leads for manga style because of its clean ink line work and screentone rendering. Both are available inside Imgezy without switching tools — the model picker is a dropdown next to the prompt box. For experimental or off-style requests, SDXL with style-specific LoRAs gives the widest creative range but loses identity preservation.
How long does it take to learn the workflow?
A first-time user can produce a printable Pixar / Manga / Claymation portrait in about 10 minutes, including reading the prompt templates and uploading a photo. Reaching consistent results across a batch usually takes 3-5 attempts to internalise which photos work and how to phrase the preservation clause. The hard part isn't the tool — it's photo selection. Spend the first 5 minutes picking a clean source photo and the rest of the workflow becomes smooth.
Conclusion
Three styles, one workflow: Pixar 3D for warm family and pet shots, manga for solo dramatic portraits, claymation for quirky and slightly imperfect subjects. The five steps stay the same across all three — pick a clean source photo, choose the right model (Nano Banana Pro for Pixar/claymation, Flux Kontext for manga), run a three-part prompt that anchors the face, review at 100% zoom, download and optionally upscale.
The 2026 wave is different because identity preservation finally works and because video tools like Reloop are pushing the static side to ship better stills as table stakes. For most creators, a static-first tool like imgezy covers daily content; reach for a video-first tool only when you actually need motion.
Ready to turn your photos into Pixar, manga, or claymation portraits? Try Imgezy free → — switch between Flux Kontext and Nano Banana Pro in one editor, batch-process a whole family set, and download with commercial rights on the Pro tier. New users get free trial credits to test all three styles before paying.