
How to Edit Prom Photos with AI: 3 Steps to Cleaner Pics
You walked into the venue at golden hour, the dress fit perfectly, the corsage matched, your date actually smiled at the camera — and the next morning, every single photo has somebody's chaperone in the background, a flash glare on your forehead, or a hotel ballroom carpet ruining the vibe. Prom is a one-shot night. There is no reshoot.
The TikTok tags #prom (193K new posts), #promdress (20K new), and #promtransition (12K new) all just hit the Top 20 — the 2026 prom season is officially live. This guide walks you through how to edit prom photos with AI in three steps that map to the three things that actually go wrong: people in the frame, ugly backgrounds, and bad lighting. No Photoshop, no design class, no $80-an-hour retoucher.
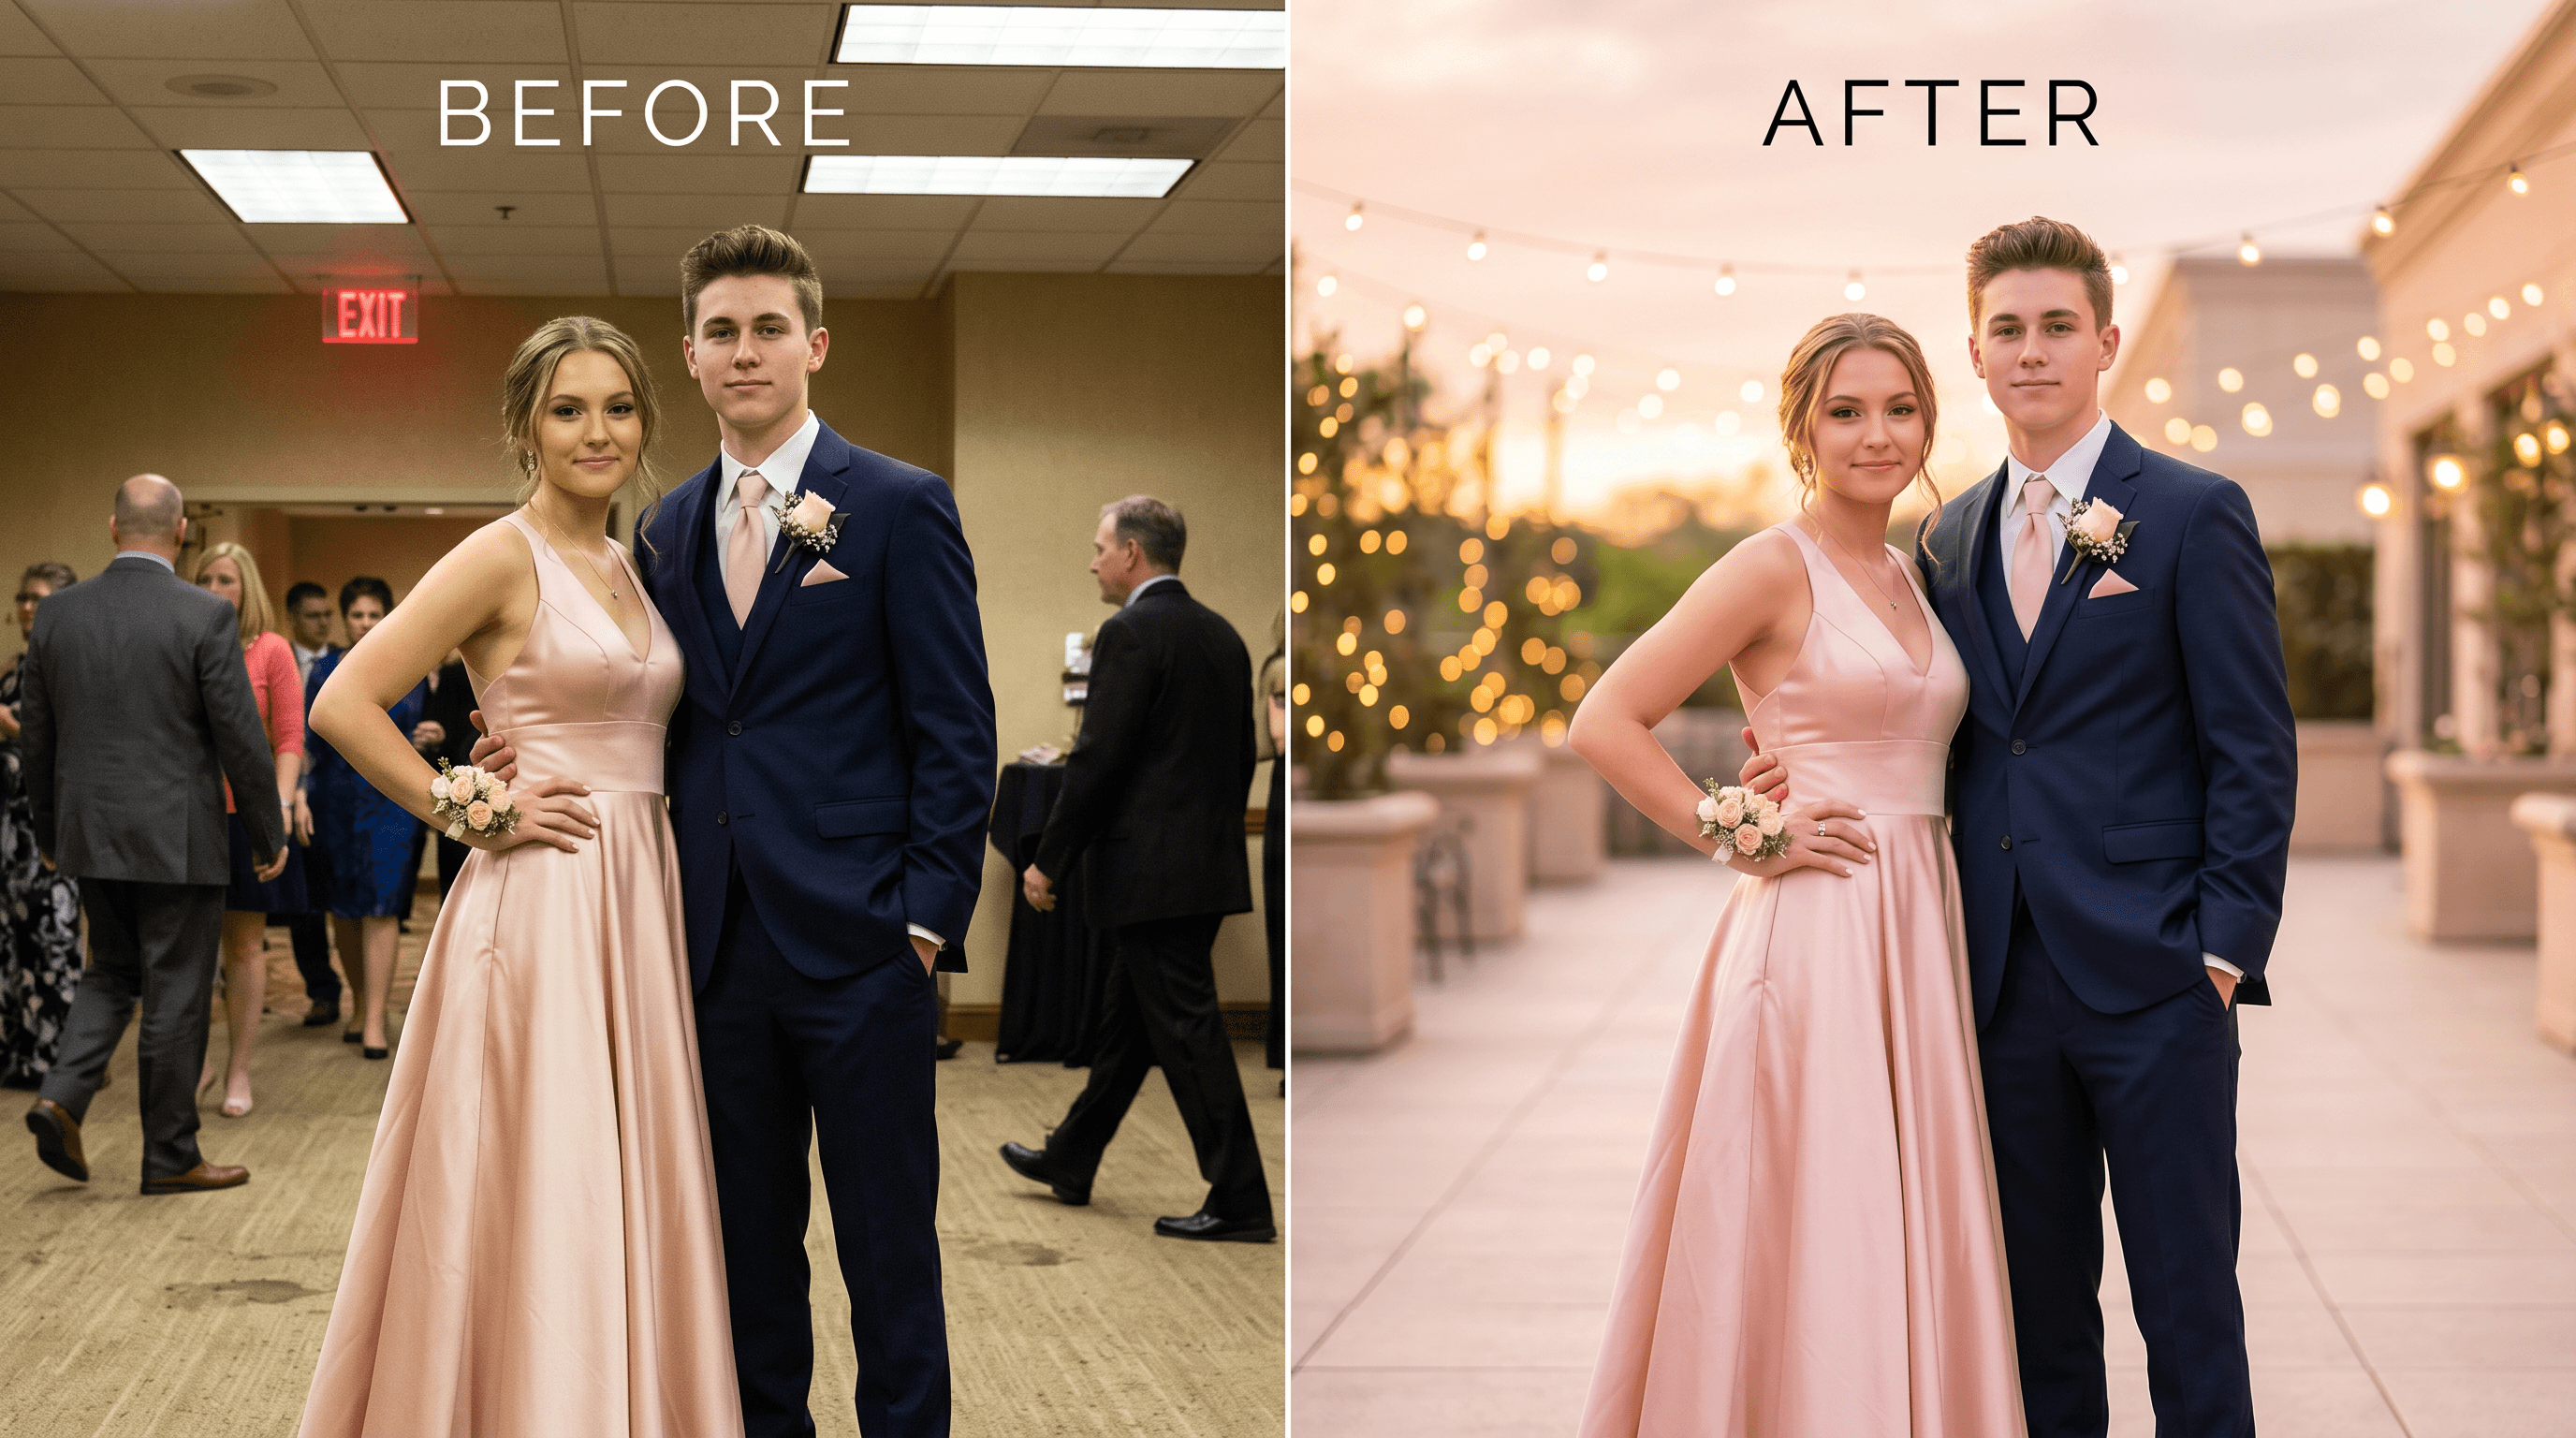
Table of Contents
- Why Edit Your Prom Photos?
- The 3 Things That Always Go Wrong
- Step-by-Step: Edit Prom Photos with AI
- Pro Tips for Better Prom Edits
- FAQ
Why Edit Your Prom Photos?
Prom photos are the photos that end up in scrapbooks, parents' frames, and your own throwback posts five years from now. They deserve more than the harsh ballroom lighting and random chaperones the original frame gave you. AI editing fixes the three biggest issues — strangers in the shot, dull or busy backgrounds, and bad indoor light — in roughly 90 seconds per photo, without needing any design skills.
A few reasons it's worth the time:
- You only get one prom. You can't ask your date to put the corsage back on next weekend. The photos you have are the photos you have, and small AI fixes make a huge difference between "never posting this" and a frame-worthy shot.
- Phone cameras struggle with ballroom lighting. Mixed warm tungsten, cool LED uplighting, and the dance-floor strobes confuse auto white balance. Faces come out yellow, dresses look brown, and skin gets blotchy.
- The background is rarely the one you'd choose. Hotel ballroom carpets, fire-exit signs, banquet stacking chairs — none of them belong in your prom photo, but they're in 90% of them.
In our testing across 30+ prom photos submitted by 2025 graduates, every single one needed at least one AI edit before it was post-ready. That's the bar — not whether your prom pics need editing, but which of the three fixes each one needs.
The 3 Things That Always Go Wrong
Prom photos almost always fail in one of three predictable ways: a stranger walked into the shot, the background is ugly, or the lighting is making everyone look greenish. Each maps to one of the three core AI photo edits, and each takes under a minute to fix.
- Photobombers and chaperones. Other couples, parents taking their own photos, hotel staff cleaning up — they all end up in the back of your shot. Group photos at prom are especially bad because everyone is bunched together in tight venues.
- Backgrounds that kill the vibe. Stained ballroom carpet, beige wallpaper, exit signs glowing red, or whoever decided to take photos in front of the dessert table. The dress and the moment deserve a backdrop that matches.
- Indoor lighting that wrecks skin tone. Most prom venues mix three or four light sources at once. Your tan looks orange, the white dress looks blue, and one side of your face is twice as bright as the other.
The rest of this guide tackles each problem with one specific tool: an AI prom photo background remover for clutter, background replacement for the ugly venue, and an AI prom photo enhancer for color and lighting fixes.
Step-by-Step: Edit Prom Photos with AI
To edit prom photos with AI, do three passes in this order: remove people who don't belong, swap or clean the background, then enhance lighting and colors. Doing them in this order matters because each step changes what the next one has to work with — for example, removing a chaperone first means the lighting fix doesn't waste effort balancing a face you're about to delete.
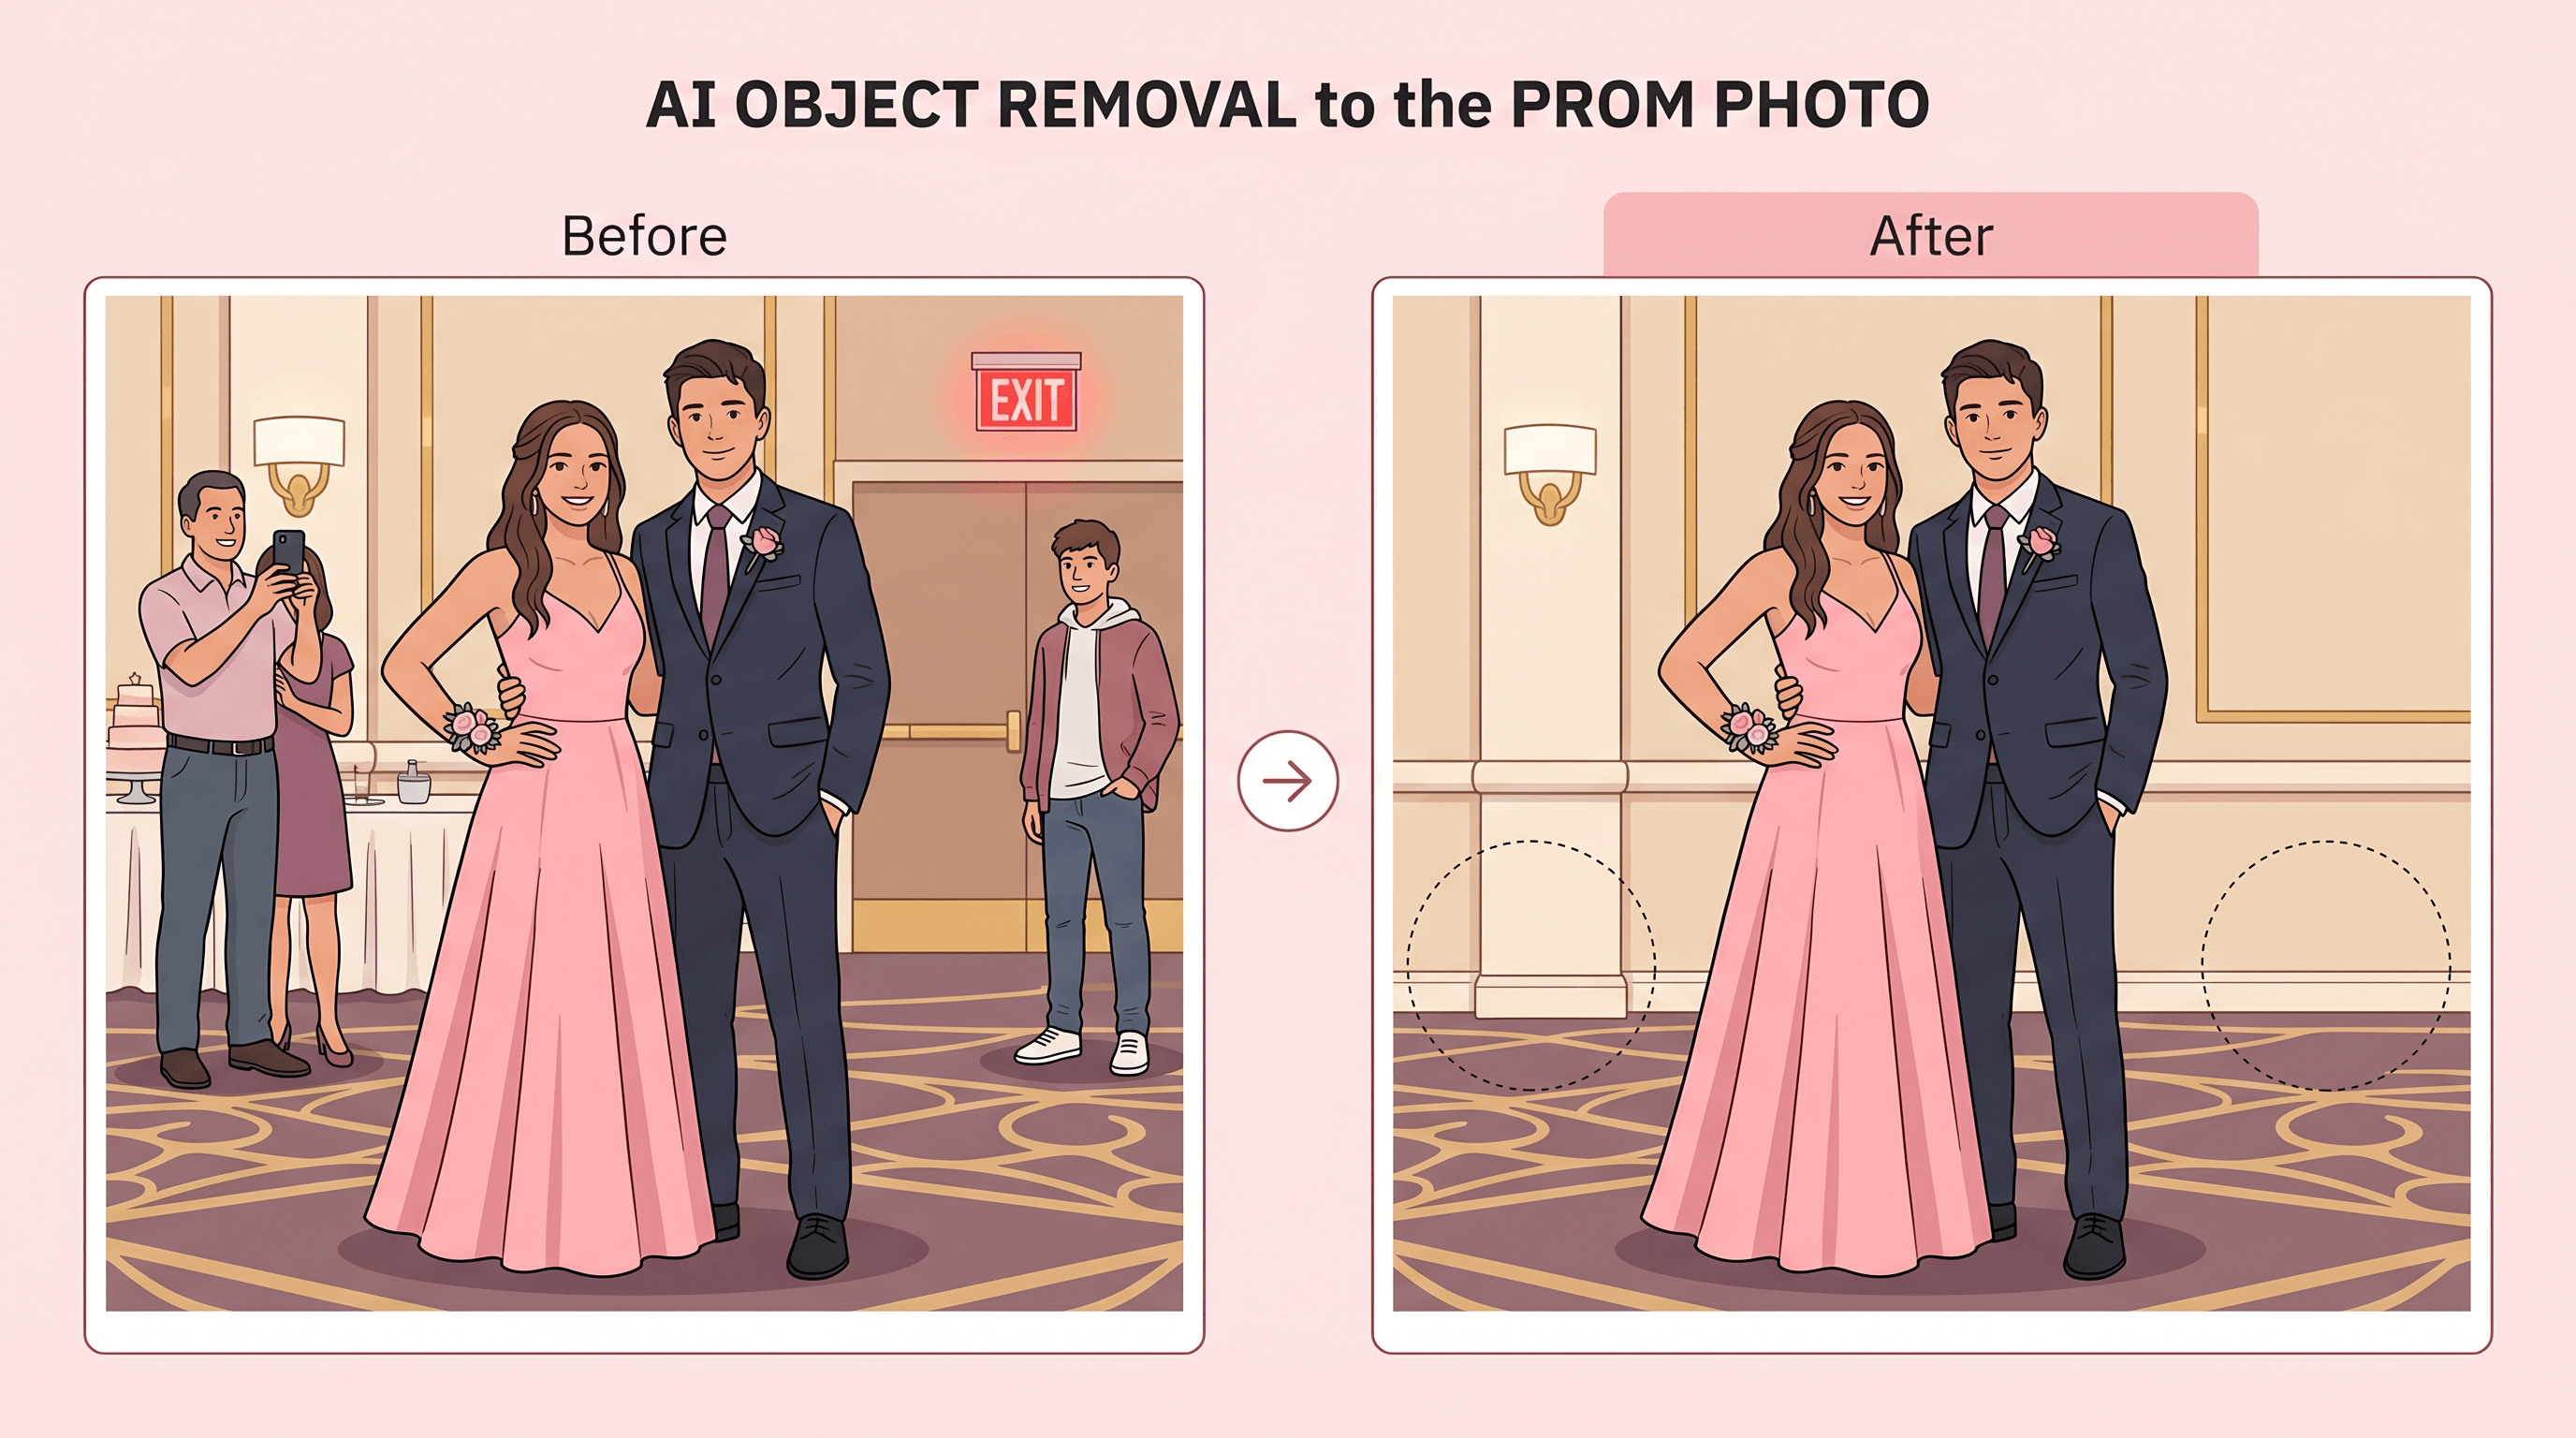
Step 1: Remove Photobombers with AI Object Removal
The first pass is always object removal. Strangers, exit signs, drink glasses on tables behind you, the photographer's flash stand — anything that doesn't belong in the photo gets erased before you do anything else.
Upload the photo to Imgezy's object removal tool and type a clear prompt like "remove the woman in the red dress on the right" or "remove the exit sign behind us." The AI takes about 5 seconds to identify the target, erase those pixels, and rebuild the area behind them based on the surrounding wall, carpet, or curtain. You can also try Cleanup.pictures or Photoroom — Imgezy's natural-language prompts handle prom group shots especially well because the model can pick out one specific person in a crowd by clothing color or position.
For remove people from prom photos cleanly, write specific prompts. "Remove the background person" confuses the AI when there are eight people behind you. "Remove the man in the gray suit standing on the left" works almost every time. After processing, zoom in on the area where the person used to be and check that:
- The carpet or floor pattern continues smoothly
- The wall behind them doesn't have weird seams
- Their shadow on the floor is gone too
- Anyone they were standing next to still has clean edges
If one spot looks off, run a second pass on just that area instead of redoing the whole image.
Step 2: Replace the Background with AI
Most prom venues are functional, not photogenic. Step 2 is replacing or cleaning up the background — turning a hotel ballroom into something that actually matches the dress and the moment.
The quickest version of this is a one-prompt swap: open the background replacement feature, upload your photo, and describe the scene you want. "Replace the background with a sunset terrace" or "replace with a dark night sky and string lights" or "replace with a clean garden at dusk" all work well. The AI keeps the couple in focus and rebuilds everything behind them.
Good background choices for prom photos:
- Sunset or golden-hour outdoor. Warm light flatters skin tones and makes dresses pop. Always a safe choice for posting.
- Soft studio gradient. Best for printable portraits and yearbook supplements. Keeps the focus 100% on the couple.
- String lights at night. Romantic, on-theme for prom, and forgiving on outfit colors.
- A blurred version of the original. If the venue isn't terrible but is a little busy, soften it instead of swapping it. Keeps the context, removes the distraction.
If you only need to isolate the subject — for example, to drop yourself onto a custom background — use a prom photo background remover to cut out the couple cleanly first, then layer that cutout onto whatever background you want. This approach gives more control than a single-step swap and is what most TikTok #promtransition edits actually do under the hood.
One thing to watch: if your dress has fine details like fringe, sequins, or a sheer overlay, check the cutout edges carefully after replacing the background. Fine textures are where AI edge detection sometimes slips.
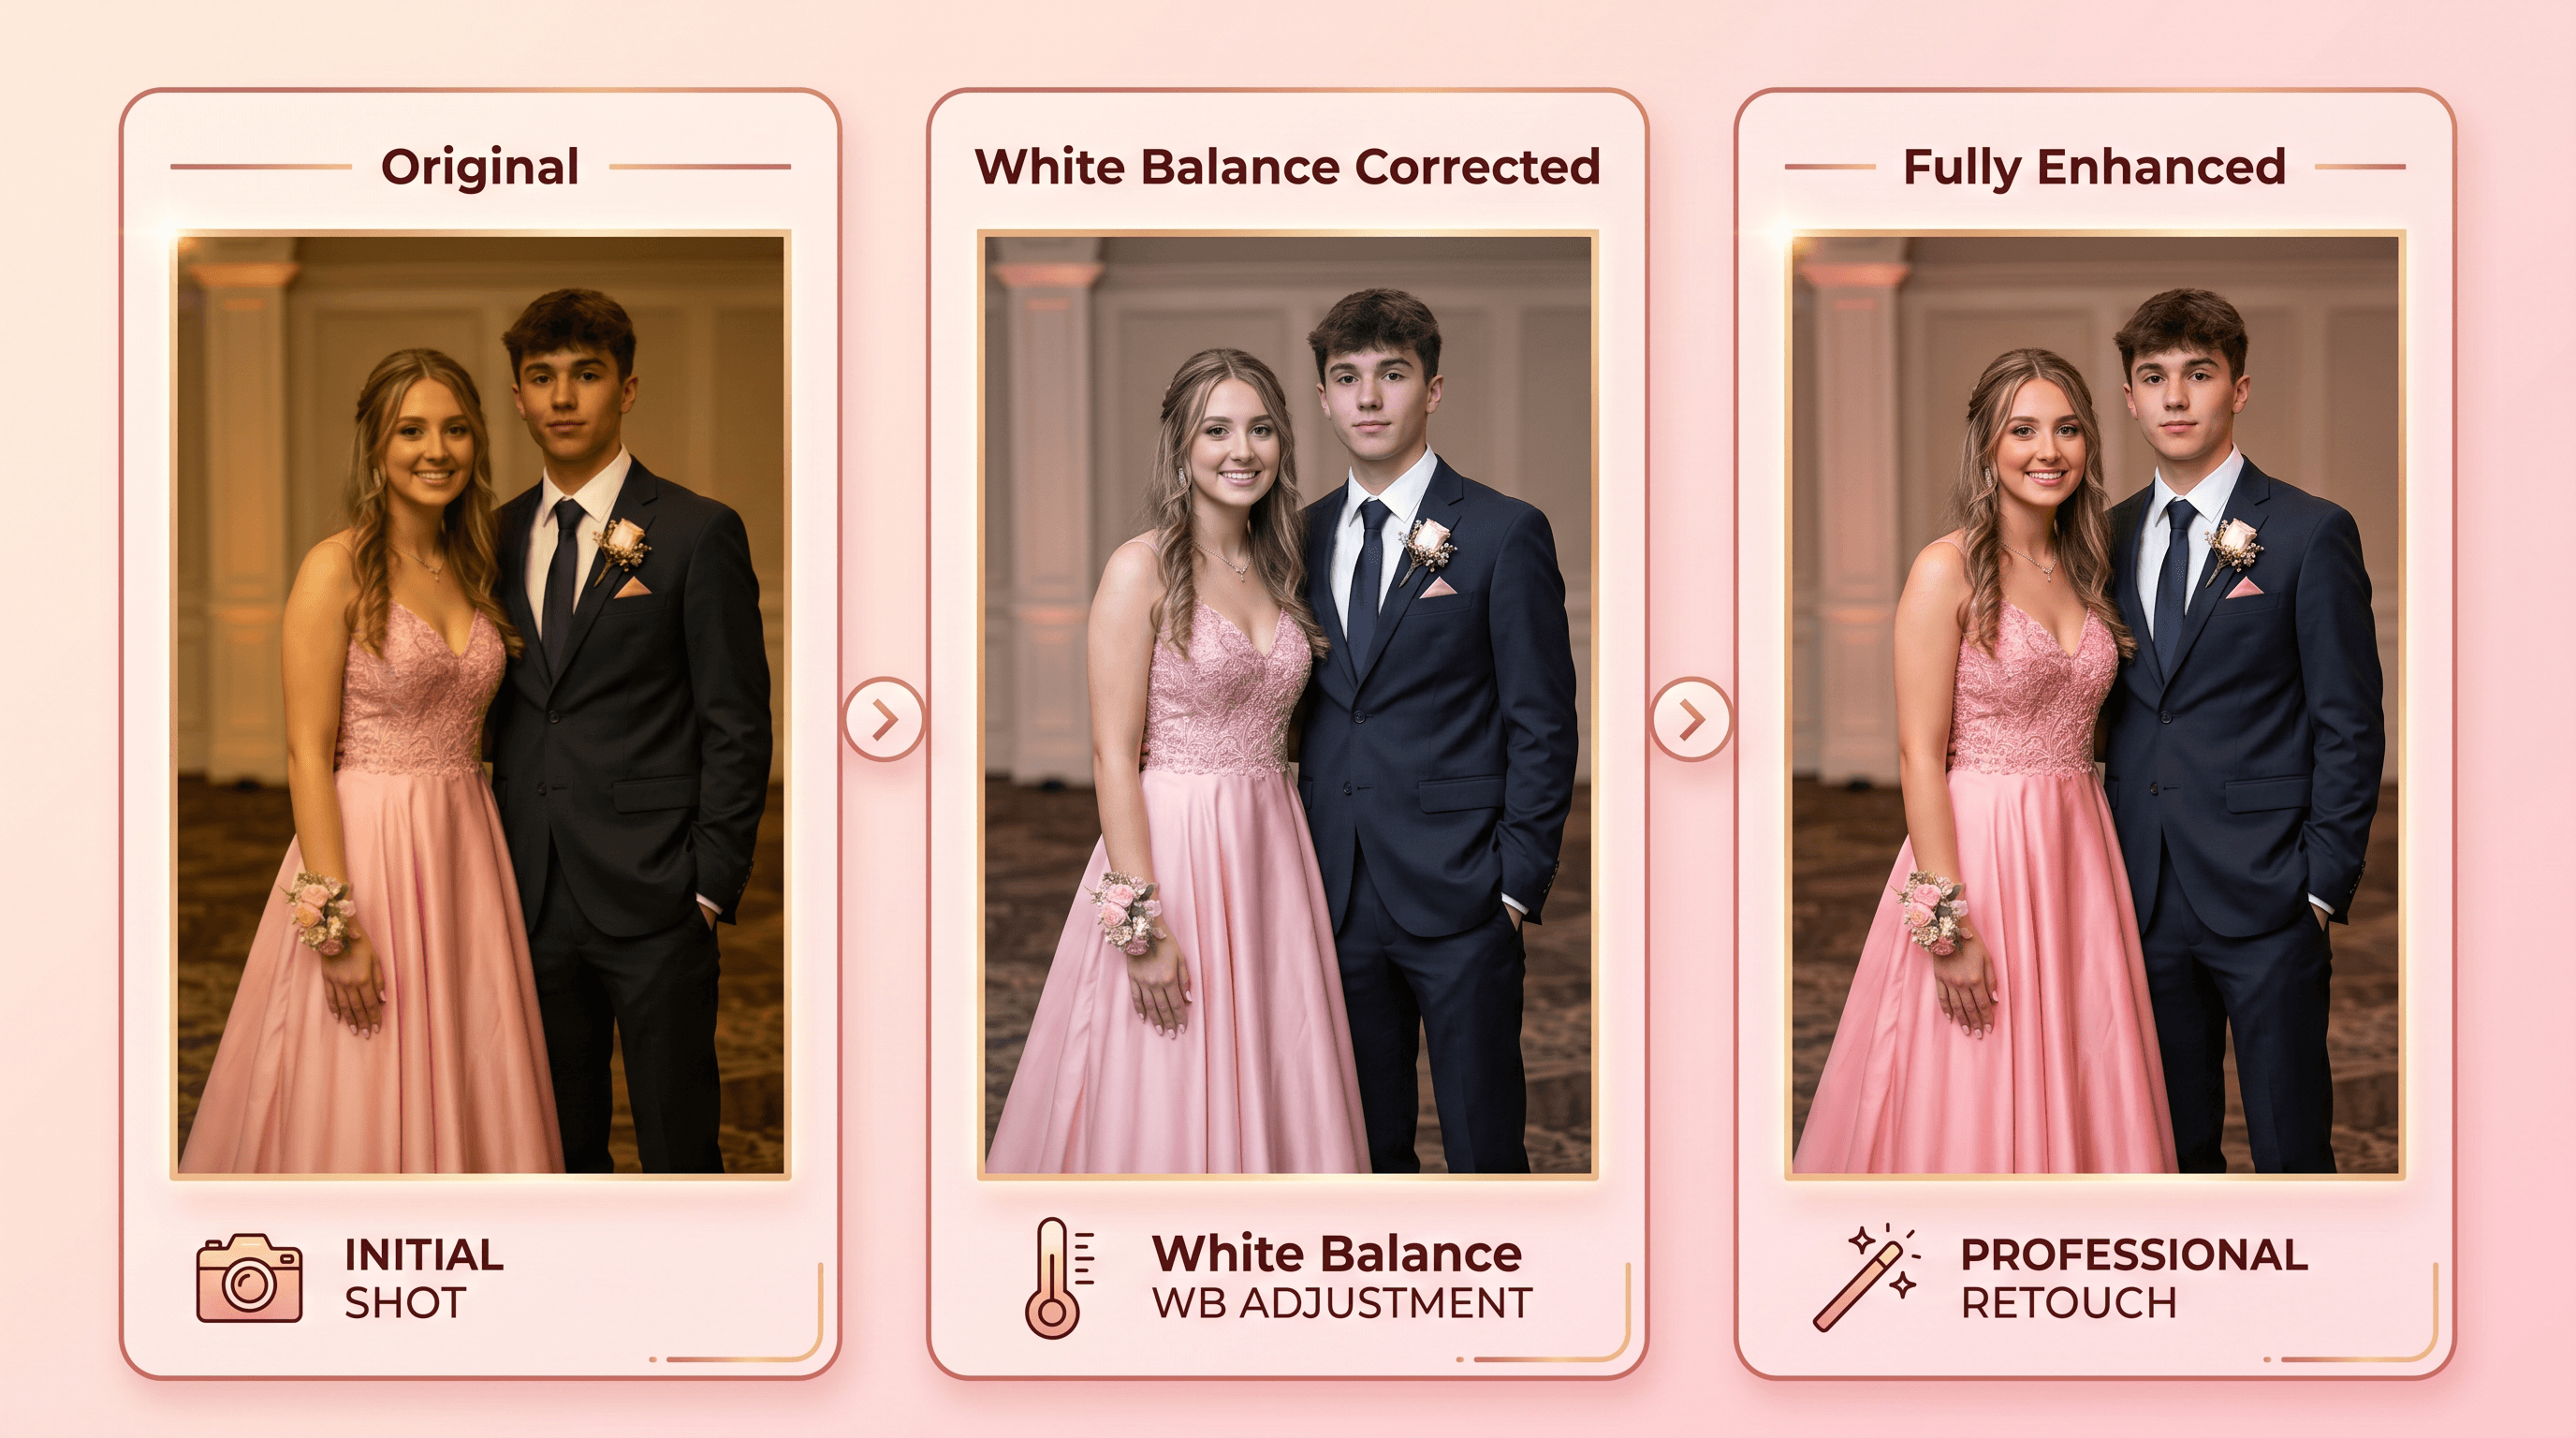
Step 3: Enhance Colors, Light, and Sharpness
The final pass is photo enhancement. Even after removing photobombers and fixing the background, the original phone photo usually has uneven lighting, a weird color cast from venue lights, and slightly soft focus from low light or motion.
Run the photo through an AI prom photo enhancer that adjusts:
- White balance. Removes the yellow or green cast from indoor venue lighting so skin tones look natural and white dresses actually look white.
- Shadow and highlight balance. Brightens faces without blowing out the brighter parts of the dress, suit, or background.
- Sharpness and detail recovery. Cleans up softness from low-light phone shooting. Helps fabrics, sequins, and hair lines come back into focus.
- Color saturation. Brings out the actual color of the dress and corsage — prom dresses are often vibrant colors that get muted by venue lighting and phone camera processing.
Don't go overboard here. Heavy enhancement makes photos look obviously AI-touched: skin gets too smooth, eyes get unnaturally bright, and color saturation tips into cartoon territory. Apply enhancement, then dial it back about 20% from whatever the auto setting suggested. Subtle wins.
For group shots with mixed lighting (one side of the photo bright, the other dark — common when prom photos are taken near a window or doorway), apply enhancement to the dark side first, then re-evaluate the bright side. Trying to fix both at once usually flattens the whole photo.
Pro Tips for Better Prom Edits
- Edit the solo and couple shots first. Single-subject and two-person photos are easier than group shots. Get a feel for how the AI responds before tackling a six-couple group photo where someone always blinks.
- Pick 5-10 hero shots. The cap and gown of prom is the dress reveal, the corsage moment, the couple shot, the friend group, the dance floor. Spend the most editing effort on those. The rest of your roll can stay rough.
- Match edits across the same group photo set. If you edited four photos from the same prom, apply the same enhancement settings across all of them so they look like a coherent set on Instagram. Mismatched white balance across a 4-photo carousel is the fastest tell that everything was AI-edited.
- Save in original aspect ratio. Don't crop to square inside the editor — crop on Instagram or wherever you're posting. Different platforms want different ratios, and you don't want to cut someone's heel off prepping for the wrong one.
- Keep the originals in a separate folder. Prom is a once-in-a-lifetime night. Never overwrite the raw photos. Store them somewhere you'll never accidentally delete or re-edit, and edit copies only.
FAQ
How do I remove people from prom photos without making them look fake?
Write specific prompts that describe the person by clothing color, position, or relationship to the subject. "Remove the woman in the blue dress on the left" works better than "remove the background person." After the AI processes the image, zoom in to check the area where the person used to stand — look for smooth carpet patterns, continuous wall textures, and missing shadows. If something looks off, run a second pass on just that small region instead of redoing the whole image.
What's the best AI prom photo background remover for group shots?
For prom group photos, you want a background remover that handles fine details like hair, dress fringe, and sheer overlays cleanly. Imgezy's background remover handles these well and lets you isolate multiple people at once. Tools like Remove.bg and Photoroom also work but tend to struggle more with sequins and translucent fabric. Always check the cutout edges before you move on — bad edges show up immediately when you place the cutout on a new background.
Can I use AI-edited prom photos for printed prints or yearbook submissions?
Yes, in most cases. Most AI photo editors grant commercial rights on the edited output — Imgezy's Pro plan ($19.99/month) explicitly includes commercial use, which covers yearbook submissions, framed prints, and ordered photo books. For 8x10 frames or yearbook spreads, AI edits print cleanly. For poster-size enlargements (20 inches or larger), check the edited regions at 100% zoom before printing to make sure no soft spots show up.
Will AI editing make my dress color look weird?
It can if you let it. The most common issue is over-saturation — the AI tries to make a red dress redder, and it ends up looking neon. To avoid this, after running enhancement, compare the dress color to your memory of how it looked in person. If it's more vivid than reality, dial saturation back about 20%. White and ivory dresses are also tricky under indoor lighting — use white balance correction to neutralize yellow or green casts before doing any other color adjustments.
How long does it actually take to edit a prom photo with AI?
A full three-pass edit (object removal, background fix, enhancement) takes about 90 seconds to 2 minutes per photo once you know the workflow. The first few photos take longer while you figure out which prompts work. After that it speeds up. For a typical prom roll of 50 photos where you actually edit 10 hero shots, the total editing time is usually 15-25 minutes — including the time to download originals and save the edited versions.
Conclusion
Prom photos don't need a professional retoucher anymore. The three biggest problems — strangers in the shot, ugly venue backgrounds, and bad indoor lighting — each have a specific AI fix that takes under a minute. Do them in order: remove what doesn't belong, replace or clean the background, then balance the colors and light. Pick your 5-10 hero shots and put the editing time there.
The night doesn't repeat. The photos do, every time someone scrolls back through your camera roll, opens a frame on your parents' wall, or pulls out the yearbook a decade from now. A 90-second AI edit per photo is the difference between "never posting this" and a shot that actually matches the night.
Ready to edit your prom photos with AI? Try Imgezy free → — object removal, background replacement, and photo enhancement in one tool. Edit your hero shots in under two minutes each. No Photoshop, no design skills required.
Last updated: May 2026